• About
    • Cut N Make Crafts Privacy & Disclosure Policy
    • Disclaimer
  • JOIN THE SVG SUPERSTAR WAIT LIST

Jav Sid

SVG Business Coach

  • Home
  • SVG Business Podcast
    • Ep: 1 Why Sell SVG Cut Files
    • Ep 2: From a full-time nurse to an SVG designer – Farren Celeste
    • Ep 3: 400+ Sales in 4 months – Find out the secret to Emma’s success
    • Ep 4: No. 1 Thing You Need to Succeed in SVG Business
  • Designing SVGs
    • 3 COSTLY SVG Mistakes to Avoid – Cricut Crafts
    • 5 Epic Reasons to Create Your Own SVGs
  • Free SVG Files
  • Cricut
    • FREE Beginner’s Cricut Course
    • Cricut Tips
      • Vinyl Tips
        • MUST-HAVE The Ultimate Life-Saver Vinyl Guide for Beginners
        • Different Types of Vinyl and How to Use Them
        • How to use heat transfer vinyl for Cricut
        • How to Keep Iron-on Transfers from Peeling
        • 5 Terrible Iron-on/HTV Mistakes to Avoid – Tips for Iron-on Transfers
        • How to Layer Vinyl in Cricut Design Space
        • 9 UNIQUE Heat Transfer Vinyl Projects to Try
      • Cricut Design Space Help
      • 9 Must-Have Everyday Objects for Cricut Owners
      • Convert Picture to SVG – 3 Quick and Easy Methods
      • Cricut Print and Cut Basics for Beginners + FAQs
      • A Complete Guide to Cricut Blades for Beginners
      • 30+ Cricut Tips for Beginners for the Best Cut
      • Ultimate Beginner’s Guide to Cricut Tools
      • Ultimate Guide to Cricut Mats for Beginners
      • Lesson 1: Cricut Introduction and Set-Up
      • A Beginner’s Guide to Design Space
    • Cricut Crafts for Beginners
      • Birthday Crafts
        • DIY Hand-lettered Cake Topper (Cricut)
      • Cricut Flowers
        • EASY Giant Paper Gerbera Daisy Template FREE SVG
        • DIY Rose Paper Flower Bouquet – FREE SVG for Cricut
        • EASY Crepe Paper Sunflower FREE SVG+TEMPLATE
      • Cricut Felt Projects
        • Cute Felt Frog Craft [Template+SVG Free]
        • Cute DIY Felt Pencil Toppers [FREE SVG]
        • Cute DIY Felt Cloud Wall Hanging [FREE SVG]
      • Cricut Kids Crafts
        • Paper Popsicle Craft [FREE SVG + PDF]
        • Super-Cute Turtle Paper Craft for Kids [FREE SVG+PDF]
        • Paper Plate Fox Cricut Craft for Kids [FREE SVG]
        • Must-Have Supplies for Cricut Beginners
        • How to Write with Cricut: Ultimate Guide
        • FREE Graduation Card SVG File + Intricate Cut Tips + Tutorial
      • Cricut Vinyl Projects
        • 4th of July Mason Jars with Patriotic SVG (FREE)
        • DIY Vinyl Mug Cricut Gift for Teachers
        • How to Make a Custom Tea Towel with Cricut
        • Cricut Mason Jar Labels DIY – FREE SVG
        • DIY Car Ornament-Cricut Maker Wood Project
        • How to Layer Vinyl in Cricut Design Space
      • Fall Crafts
      • Graduation Crafts
      • Home Decor
        • DIY Welcome Tile with Cricut [FREE SVG]
      • Mother’s Day Crafts
        • Free Mother’s Day SVG – Gift Box Tutorial
      • Unicorn Crafts
        • DIY Unicorn Bookmark Using Cricut
        • DIY Unicorn Hair Clips – FREE SVG
        • DIY Unicorn Paper Clips – Beginner Cricut Project
        • How to Make a Unicorn Birthday Banner – FREE SVG
      • Wedding Crafts
        • FREE Wedding Card SVG File + Tutorial
        • Wedding Themed Lantern FREE SVG
  • Cookie Policy (EU)

How to make a border in Cricut design space

September 28, 2020 by Sumayyah Khan

Jump to Tutorial Print Tutorial

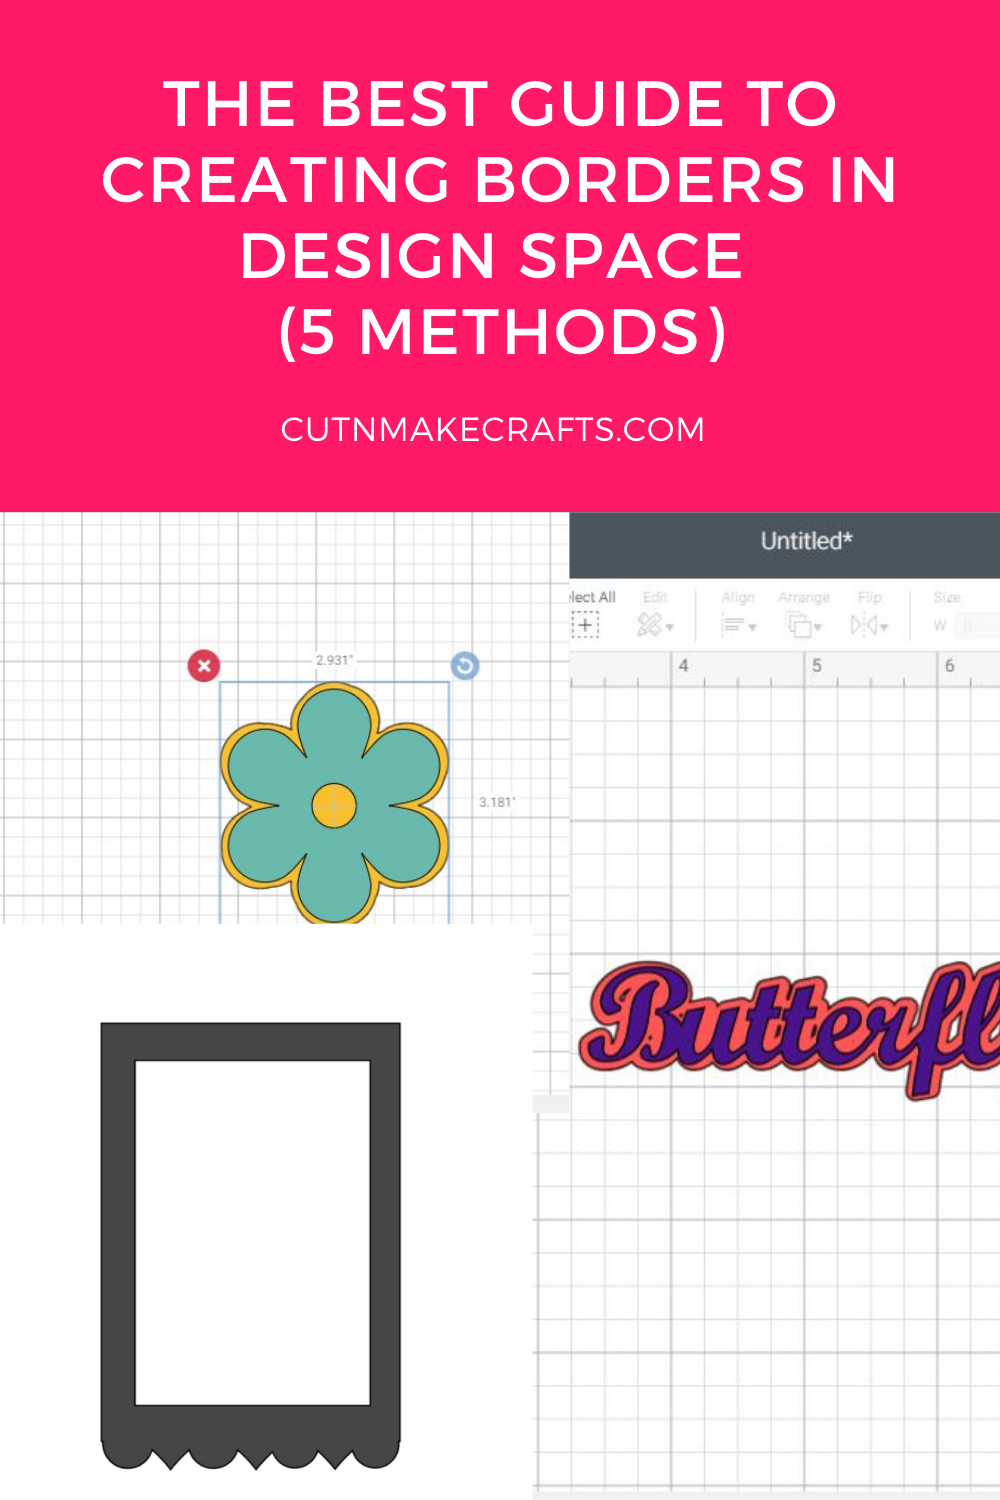
In this tutorial, you will learn how to make a border in Cricut design Space around images and texts. You will also find a step-by-step tutorial on creating borders using shapes and images in Design Space with the help of the slice and contour tool. This tutorial is another one in the Cricut Design Space Help series.
How to make a border in Cricut design space

Hello, Cricut crafters, Jav here from Cut N Make Crafts/Cricut Maker Crafts. Today’s tutorial is all about creating and making borders.

Borders are a great way of adding dimension to your Cricut crafts. They are very easy to create and can be made with simple steps in Design Space. In today’s border tutorial, you will find not one but 5 different ways you can create borders in Cricut Design Space.

Table of Contents

  • How to make a border in Cricut Design Space
    • Equipment
    • Instructions 
      • How to Make a Border around an Image in Cricut Design Space
      • How to Add a Border Around Text in Cricut Design Space
      • How to Create Borders Using Shapes in Design Space
      • How to Create Borders with Designs in Design Space
    • Notes
  • How to Create Borders/Shadows Around Text in InkSpace for Design Space
  • How to Create Wavy Borders in Cricut Design Space
  • More Cricut Design Space Help
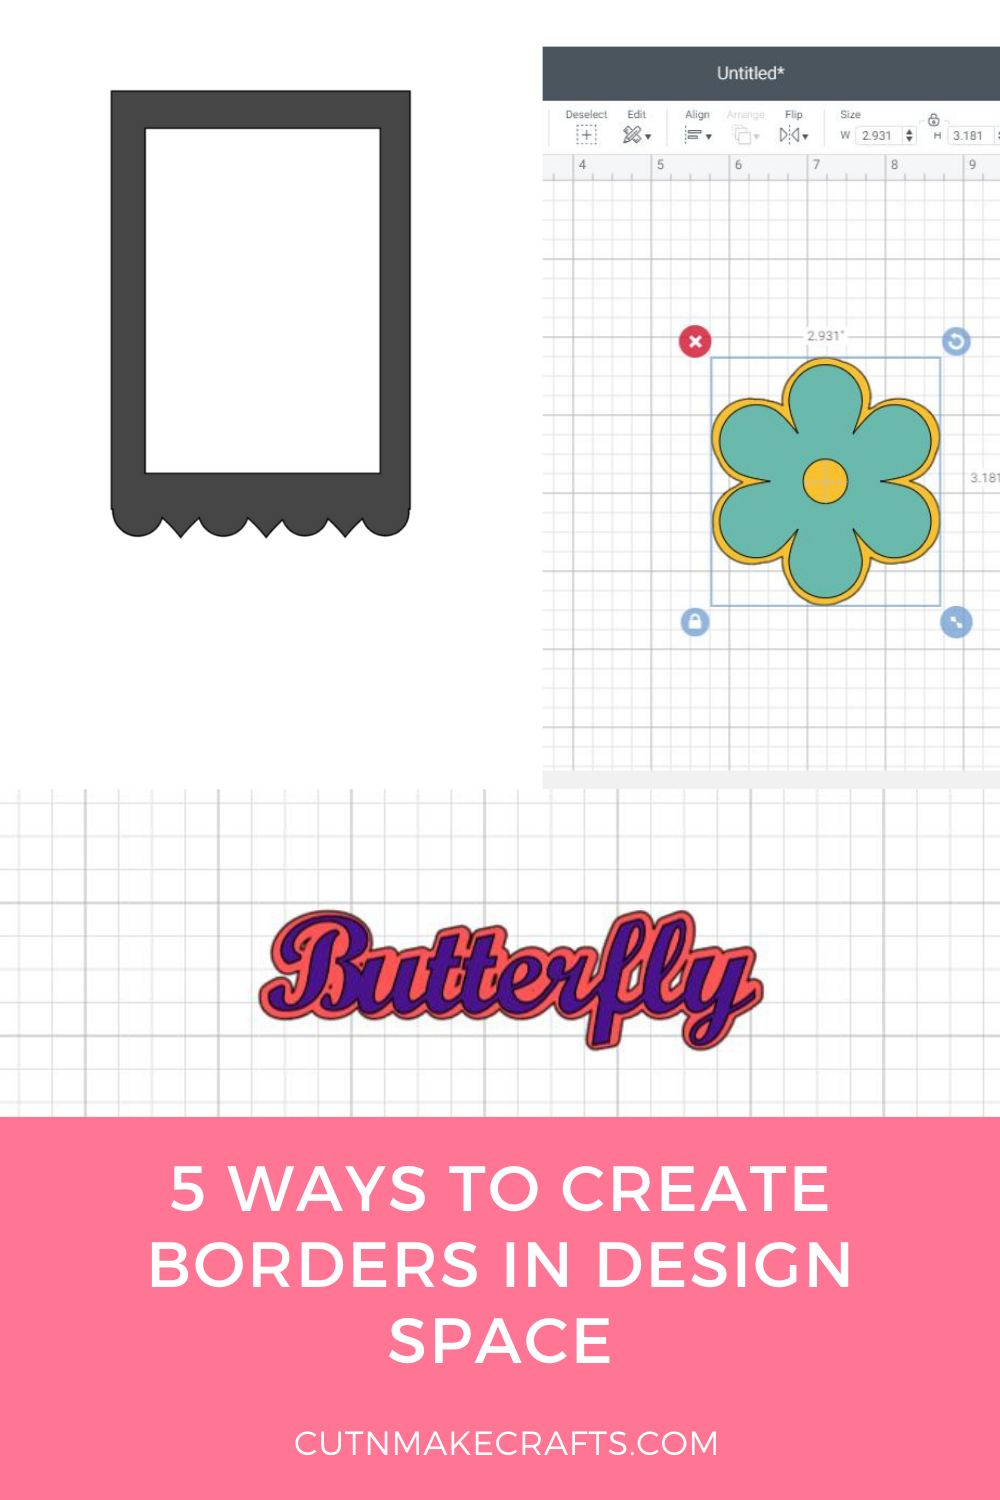
  • Pin this image for later!

How to make a border in Cricut Design Space

Sumayyah Khan
Hey Cricut lovers! I'm Sumayyah from @CraftYourMemoriess on Instagram and welcome to Cut N Make Crafts. Today I will be showing you how to make a border around an image and text on Cricut Design Space.
Print Tutorial
Total Time 5 mins

Equipment

  • Design Space

Instructions
 

How to Make a Border around an Image in Cricut Design Space

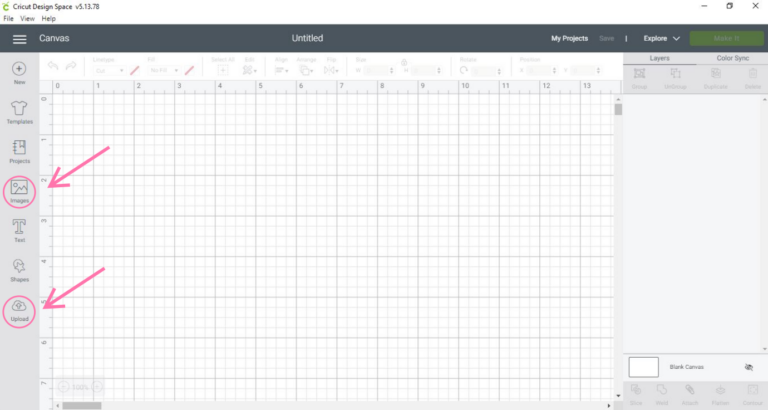
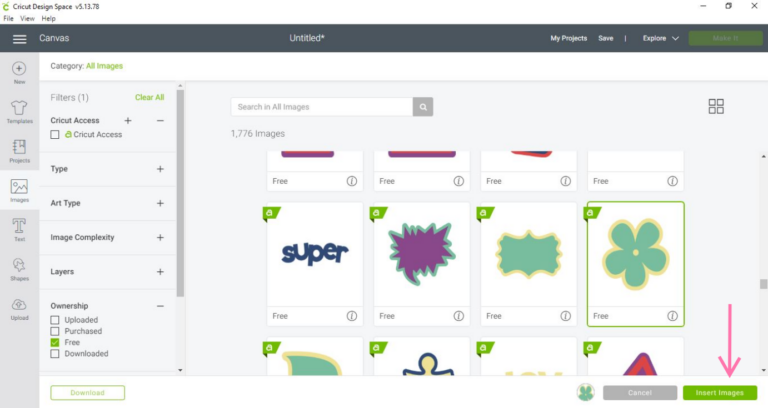
  • 1.     There are a few ways to create borders around an image or text in Cricut design space. First, start a new project and go to your canvas. Upload an image onto Cricut design space by pressing ‘upload’ or add an image from the Cricut library by pressing ‘images’.
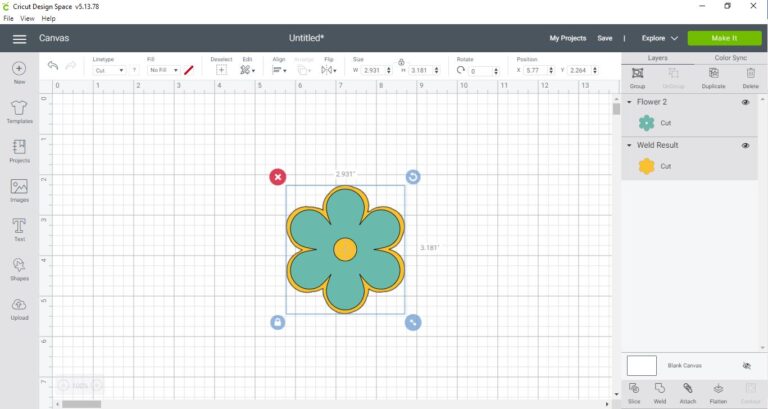
  • Insert an image of your choice to the canvas by pressing ‘insert’. I will be using the image of a flower.
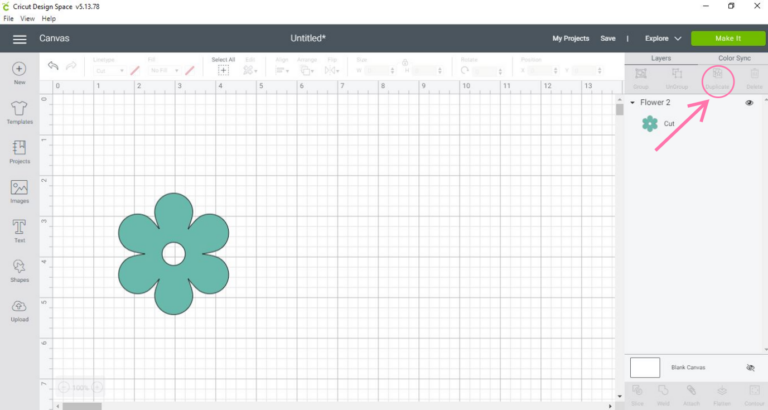
  • Duplicatethe image by pressing ‘duplicate’.
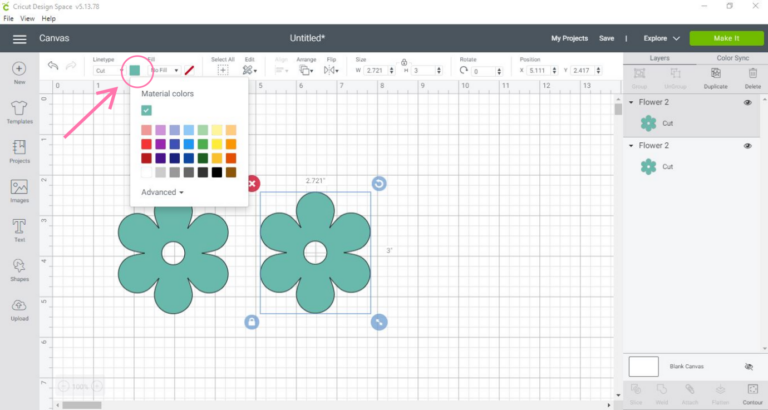
  • Then change the colour of the duplicated image by using the colour tab on thetoolbar.
  • Contourthis image to remove the gap by pressing ‘contour’.
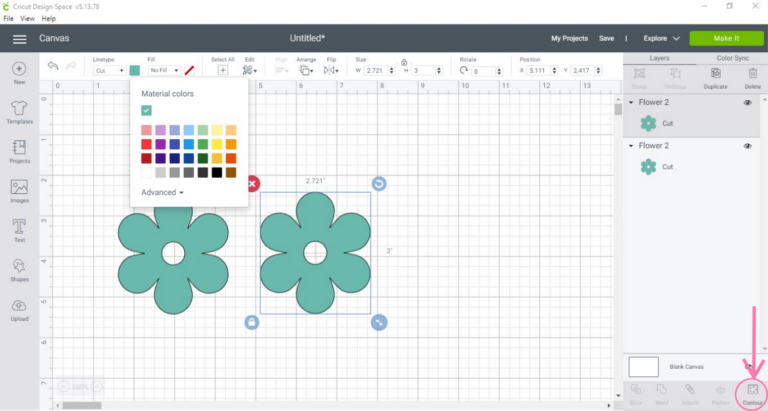
  • Select the pieces that need to be removed in order to create a silhouette.
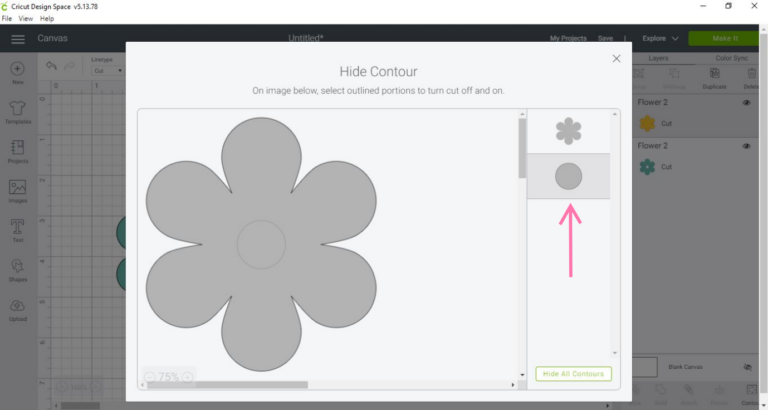
  • When you click out of the box to access the canvas, you will be left with a silhouette of the image. Duplicate this silhouette at least 5 – 6 times. This number may vary according to the image.
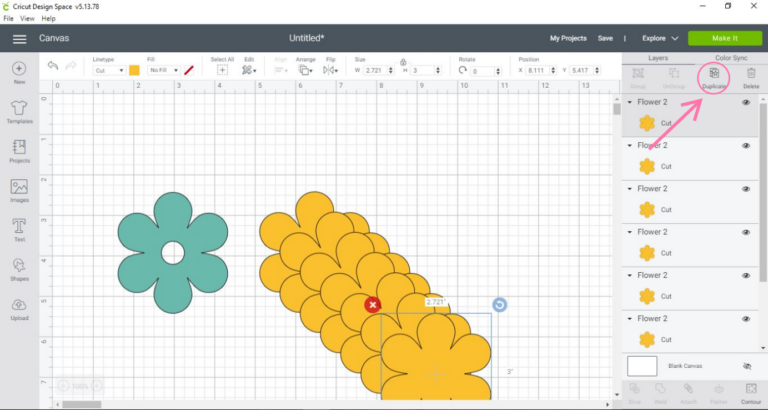
  • Move all the duplicated silhouettes to one side of the canvas, except for one.
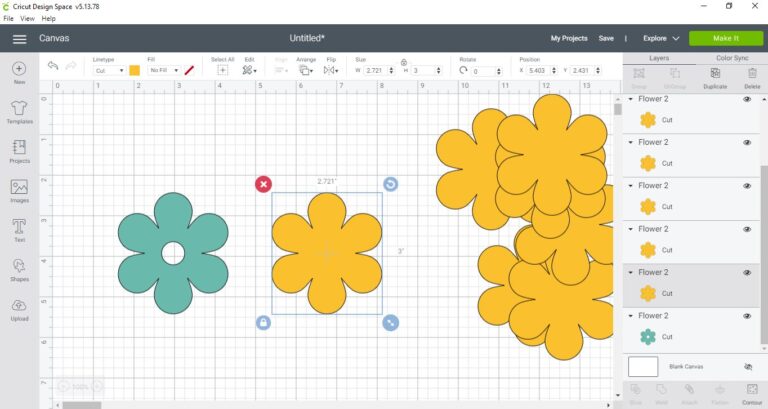
  • Now one by one, each silhouette should be moved back to the silhouette you kept inthe center. However, the placement of each silhouette should be different each time. Arrange the image by sending it to the back in order to see where it is exactlygoing to be placed.
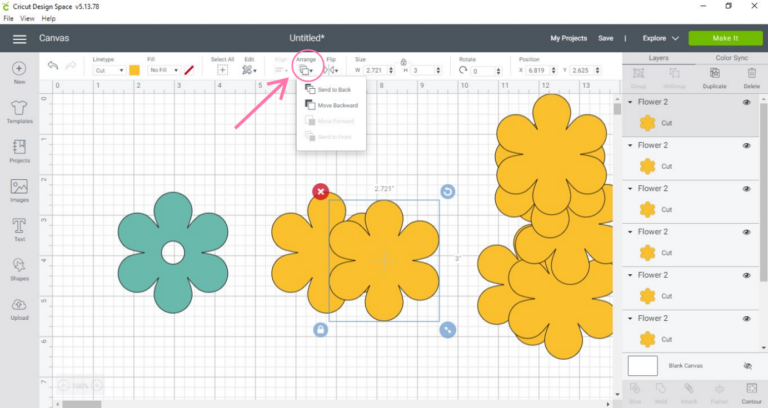
  • To move the silhouettes at a differentplacement each time, move one silhouette back to the middle image but offset it slightly to the left.
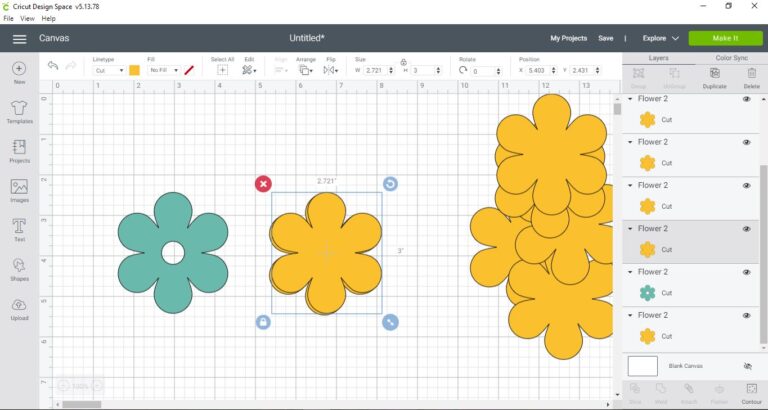
  • Then I will drag another silhouette and place it slightly to the right.
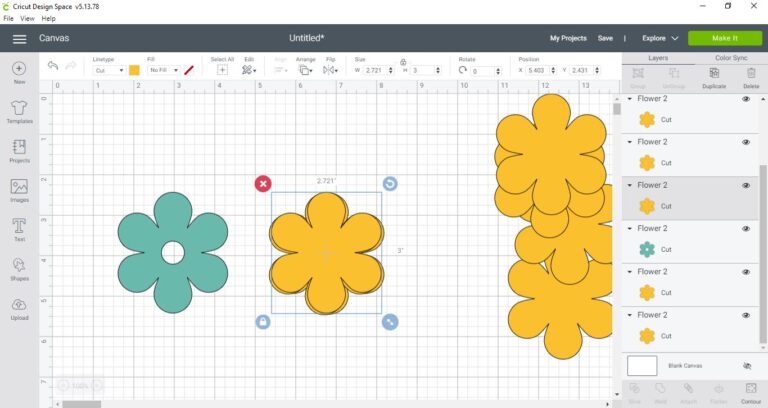
  • Continue doing this for all the silhouettes by placing each one slightly to the bottom left, bottom right, top left and top right.
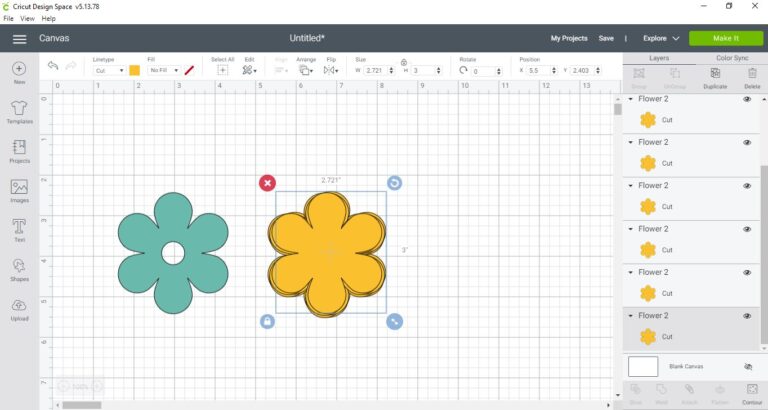
  • Then select all the silhouettes by highlighting over them or by clicking them all in the layers panel. Press ‘weld’.
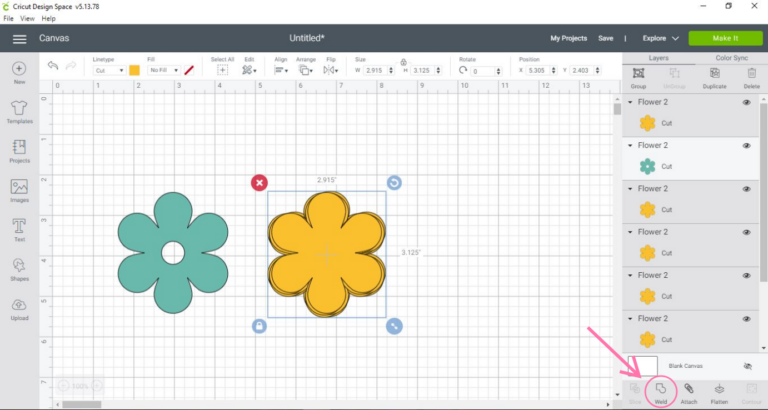
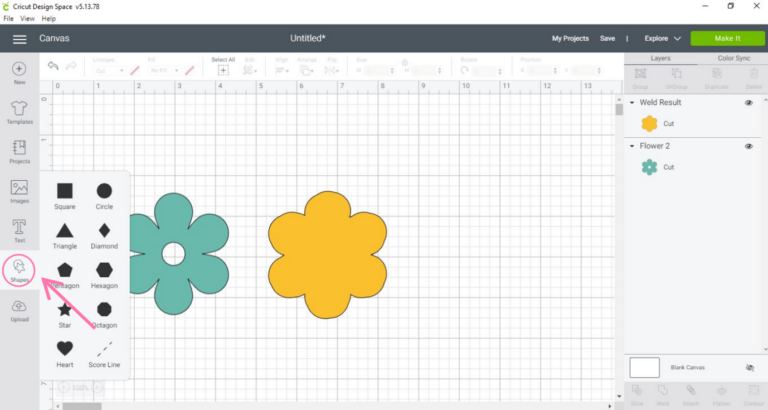
  • The image may look a little bit odd, but this can be fixed by using the ‘shapes’ tool. Select a circle and it will be automatically added to the canvas.
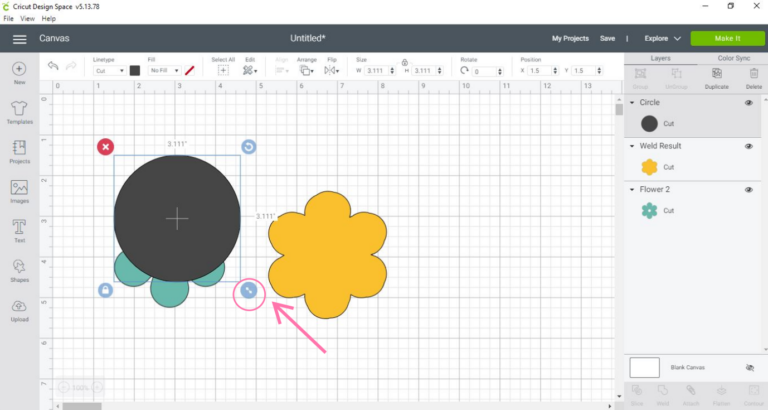
  • Resizethe circle by using the dual arrows and dragging it to be smaller.
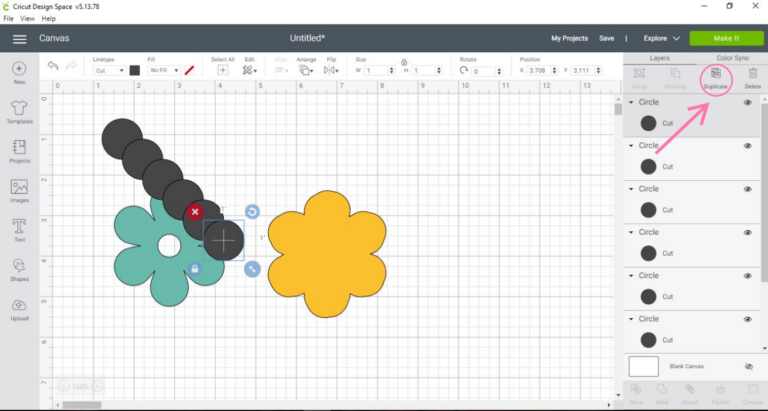
  • Duplicatethis circle a few times by pressing ‘duplicate’.
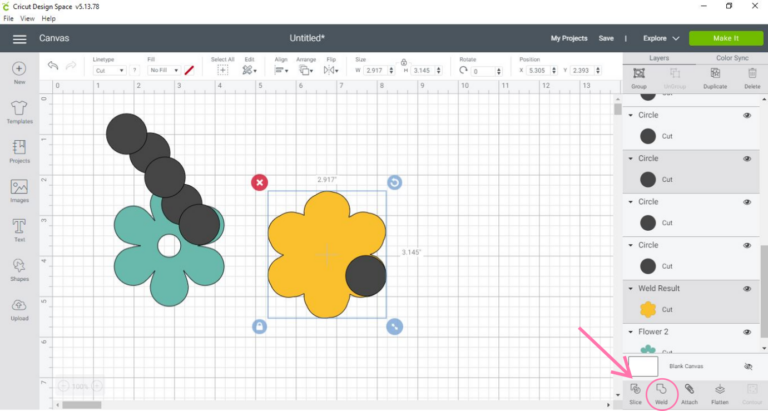
  • The circle can then be moved around the image to fix the curves of the flower by selecting the circle and the flower, and then pressing ‘weld’. Continue doing this with the other duplicated circles.
  • Oncethe image has been fixed, you can layer the original flower on top of the silhouetteand see how a border has been made. Press ‘align’ and then center the images.
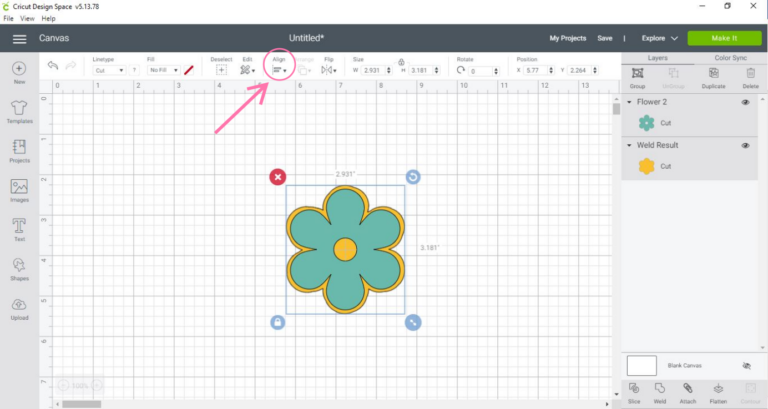
  • Thiscan now be cut out.

How to Add a Border Around Text in Cricut Design Space

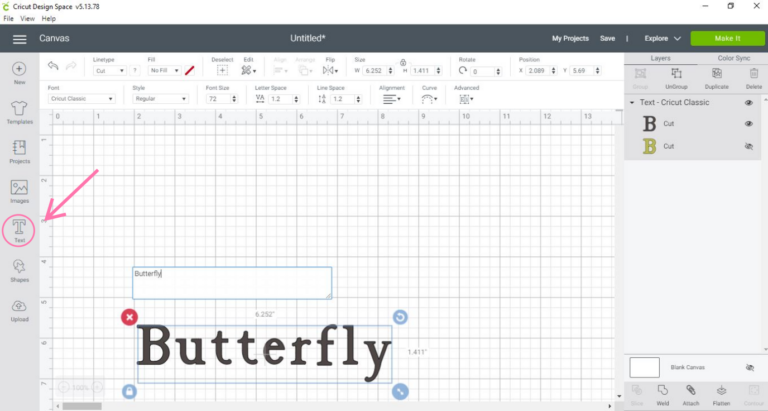
  • This same procedure can be used for making a border around text. Add text into the canvas by pressing ‘text’.
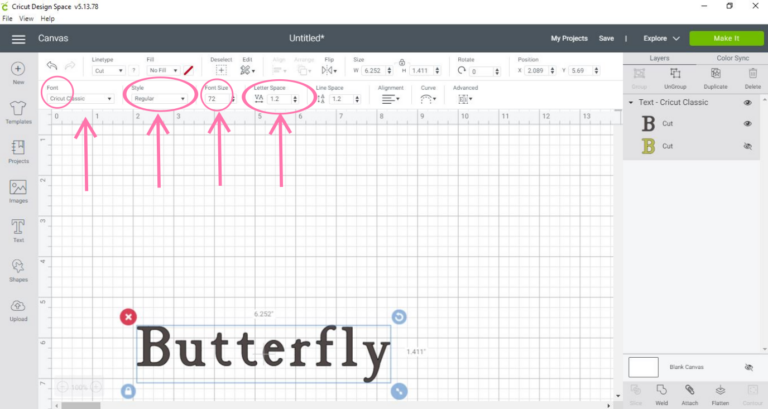
  • Select your font, style and size by pressing the icons. You can also change the letter spacing to decrease the gaps.
  • Even after decreasing the letter spacing, there is still a gap in between the ‘b’ and the ‘u’. However, by using the letter spacing tool, the rest of the letterswill become squished. To resolve this, ungroup the word by pressing ‘ungroup’.
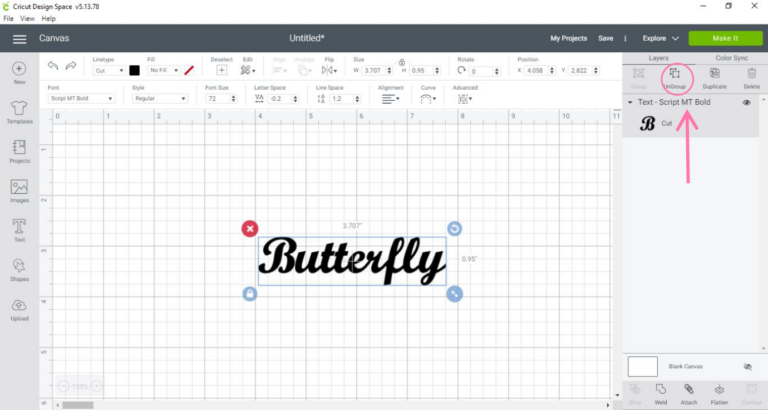
  • The ‘b ’can now be moved over by dragging or using the arrow keys on your keyboard. Irecommend using the position tool by changing the numbers on the ‘X’ axis sincethe gap is very small. Once the spacing is done, select all the letters and press‘ weld’.
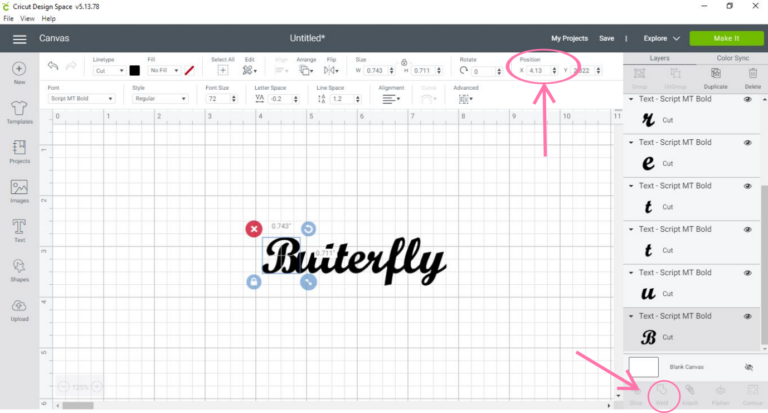
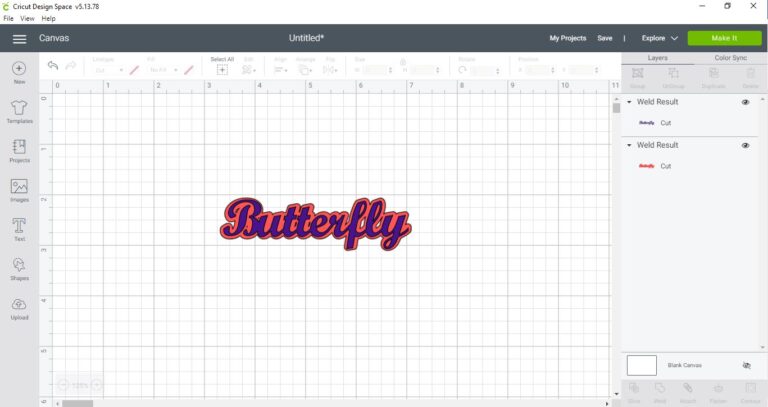
  • Now we can follow the same procedure as shown in from step 7 to step 19. The result is shown in the picture.
How to Create Borders Using Shapes in Design Space

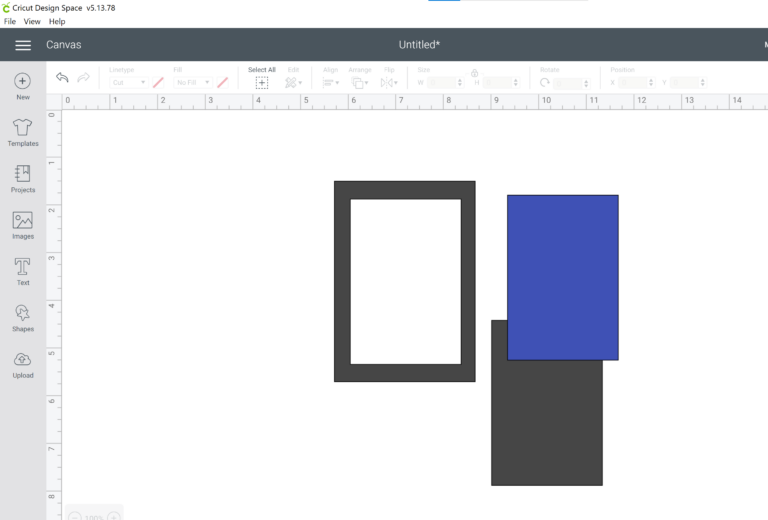
  • First, add a square from the shapes section in the left-hand menu. Unlock the square and sretch it vertically to turn it into a rectangle.
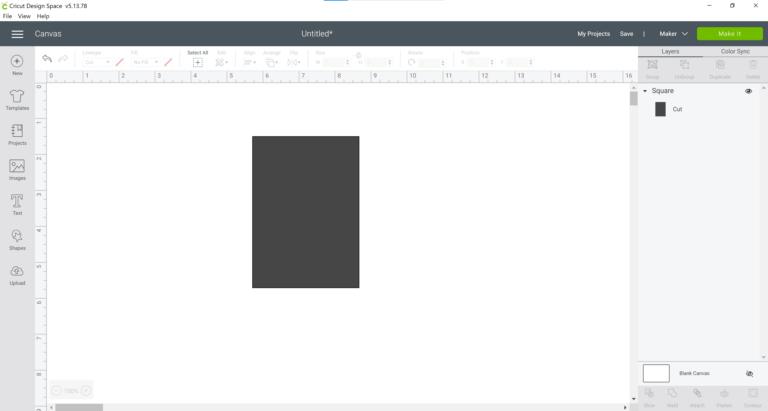
  • Duplicate the rectangle.
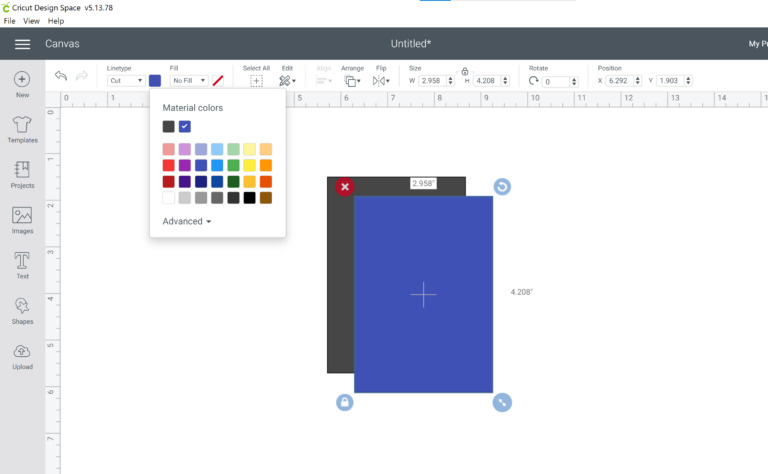
  • Reduce the size of the new rectangle, change its color and place it on top of the larger rectangle as shown in the image. Select both the rectangles and click slice at the bottom right corner of the screen.
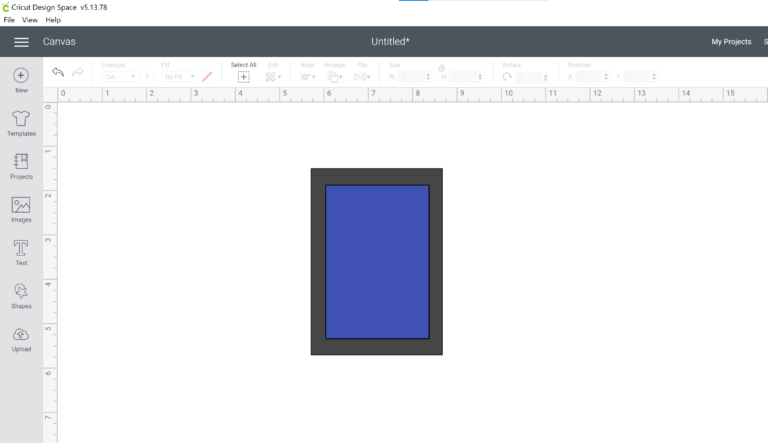
  • You should now have a lovely rectangular border as shown in the image with two extra rectangles that you can delete.
How to Create Borders with Designs in Design Space

  • Now, if you want to take this one step further and add some designs to your border, you can do so by first going to images and then typing patterns in the search box.
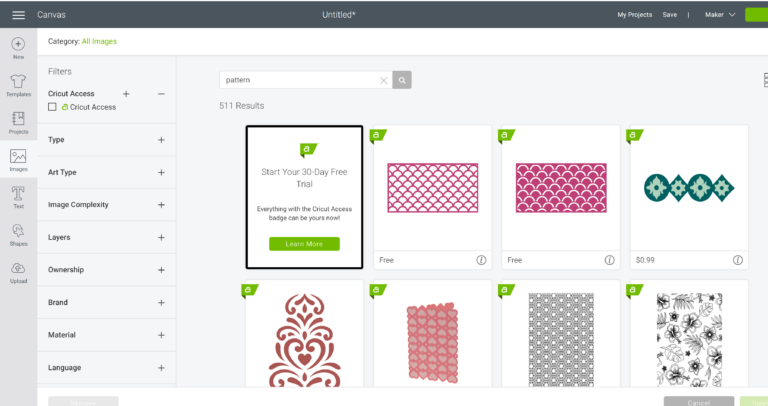
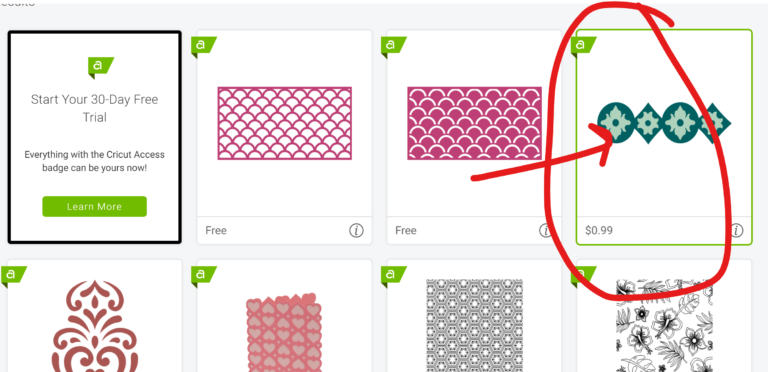
  • Select an image that sort of looks like a border and click on insert image to add the image to your canvas.
  • Once on the canvas, resize it to fit along the edge of the rectangle as shown below.
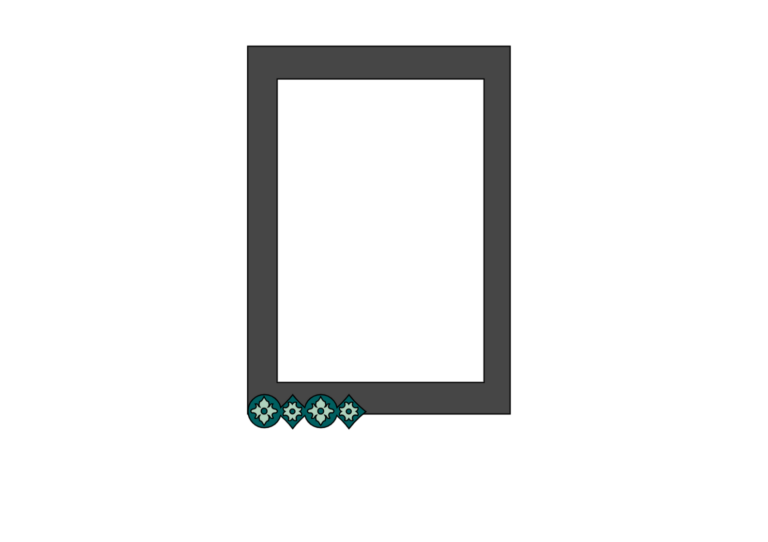
  • Dulicate the image, flip it over and align it with the previous image.
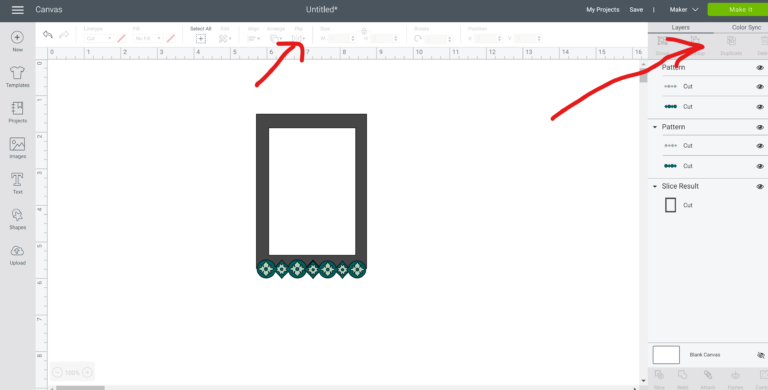
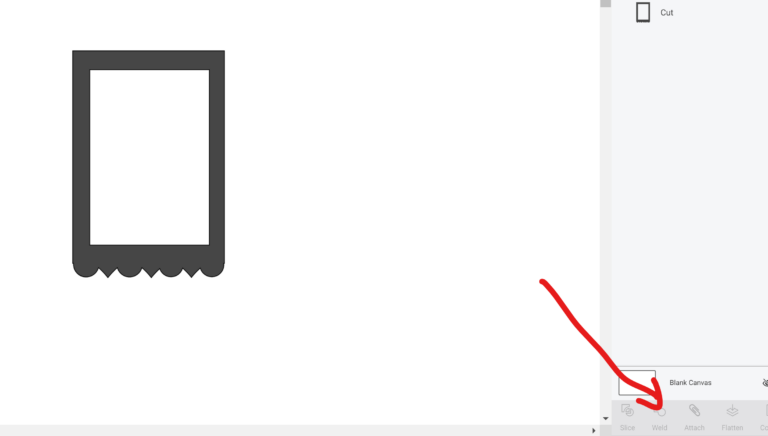
  • Select all three images, and click on weld at the bottom right corner. That's it! Your border is ready!
Notes

MASTER DESIGN SPACE! GET THE DESIGN SPACE CHEAT SHEETS FOR BEGINNERS!
cricut cheat sheets for crafters

How to Create Borders/Shadows Around Text in InkSpace for Design Space

Now let’s have a look at another method of adding borders around text but this time I will show you how to do this in an illustration software called InkScape.

InkScape is a free illustration software and perfect for creating SVG designs if you’re just starting out. I highly recommend all Cricut users to get this free software for their computers so you can create SVG designs like the one I show in this video effortlessly.

If you’re looking for another version of creating shadows around your text, you can check out the shadow tutorial here. There’s also a tutorial on how to add solid lines in Cricut Design Space here.

How to Create Wavy Borders in Cricut Design Space

More Cricut Design Space Help

If you’re new to Cricut, you might also want to check out these helpful Design Space tutorials to help you master Design Space and Cricut crafting.

  1. DIY Business Cards in Design Space (So Cute)
  2. How to create a layered image on Cricut

Pin this image for later!

Related Posts:

  • How to delete uploaded images in Cricut design space
    How to delete uploaded images in Cricut design space
  • How to Make Planner Stickers with Cricut (7 FREE Templates)
    How to Make Planner Stickers with Cricut (7 FREE Templates)
  • How to make Magnets with Cricut Explore Air 2 and Cricut Maker
    How to make Magnets with Cricut Explore Air 2 and Cricut…
  • How to make pop-up Mother's Day card [Cricut Project]
    How to make pop-up Mother's Day card [Cricut Project]

Filed Under: Cricut Design Space Help Tagged With: Cricut tips for beginners, design space

Previous Post: « 7 FUN Free Cricut Card Projects
Next Post: FREE Monster Bookmark Template&SVG »

Reader Interactions

Trackbacks

  1. How to group and ungroup words on Cricut Design Space - says:
    October 2, 2020 at 11:47 am

    […] Hello, Cricut buddies! Jav here from Cut N Make Crafts. If you know how to group and ungroup texts you can do a ton of things to add a beautiful touch to your Cricut projects. Ungrouping a text will also allow you to create a shadow/outline behind the text as shown in this tutorial: How to make a border in Cricut design space.  […]

Primary Sidebar

Recent Posts

  • Get Free SVGs – Creative Fabrica
  • Mother’s Day Sublimation Designs for T-shirts
  • DIY Penguin Mug Holiday Decor
  • EASY Holiday Cake Topper Tutorial
  • Super Easy Felt Unicorn Ornament SVG + Tutorial

Amazon Affiliates Disclosure

Cut n Make Crafts is a participant in the Amazon Services LLC Associates Program, an affiliate advertising program designed to provide a means for sites to earn advertising fees by advertising and linking to Amazon.com.

Footer

cutnmakecrafts

Jav | SVG Business Coach
Going from skeptic to success 💪 Overcoming my f Going from skeptic to success 💪 Overcoming my fear of investing in coaching programs led me to financial freedom. Don't miss out on the opportunity to transform your life and business. 

Join me on this journey with payment plans starting at $497 or join the membership for $9.99. Let's reach our full potential together! 

#InvestInYourself #FinancialFreedom #BusinessGrowth
#svg #svgfile #svgcuts #cricutcrafts #cricutpro #cricutmaker 
#svgdesigns
Success isn't just about hard work, it's about sma Success isn't just about hard work, it's about smart choices! Learn from Linda and Christine's experience and join the #SVGSuperstar program for a chance to take your business to the next level 💰💻 

#passiveincome #SVGdesigns #svgfiles 
#svg #cricutcrafting #svgcuttingfiles
500+ SALES IN OVER 6 MONTHS! These are real numbe 500+ SALES IN OVER 6 MONTHS!

These are real numbers from my student S SVG shop.

However, before S started working with me:
- She wanted a passive source of income to support her when things went wrong
- She had tried designing on Design Space and Inkscape but got really frustrated with the program because it wasn’t very intuitive
- It was taking her days to put together a simple design which really slowed down her income growth
- She had 12 sales in her shop for months

It wasn’t just that.
It was how she felt stuck when it came to growing her income.

Not being able to reach the income goal she desired.

Then she enrolled in the SVG Superstar Coaching Program

- She followed the step-by-step process for designing SVGs which helped her in creating new designs 10x faster
- Started creating gorgeous designs using the market research strategies taught in the program
- Used constructive feedback from the coaching community to improve her designs

Using her limited time in the most efficient way S was able to go from 12 sales to 500+ and is now selling on THREE different platforms in just a couple of months (and not years!).

But not just that, S is LOVING the fact that she is able to make 100+ sales even when she’s away from her shop.

If you’ve listened to this and you know this is what you need, 
- You want to start making a consistent $1000-$1500 monthly income from SVGs, 
You want to stop wasting time being frustrated not being able to hit that income goal from your business
Then let this be your sign!

Join the SVG Superstar Coaching Program now to start making consistent monthly income from SVGs so you can live the life of your dreams. 

Want to learn more?
Message “SVGs” to get started.
Payment plans start at $497.
Or join the membership for $9.99!
Registration is open for the Spring Crafts Fiesta Registration is open for the Spring Crafts Fiesta - an online event for Cricut crafters! 
It was created to help you learn EVERYTHING about Cricut. 
We kick off on Feb 18 with 2 days of action-packed presentations. Click here to learn more! >> craftysummits.com
Load More... Follow on Instagram

Hi, friend! I’m Jav, a research assistant/SVG design coach. I’m here to help you design and sell SVG cut files. Check out my SVG Business Podcast if you want to start your own SVG business!


Cut N Make Crafts Privacy Policy

ARCHIVES

svg business class - how to design and sell SVG cut files

Copyright © 2023 · Sprinkle Pro theme by Restored 316