• About
    • Cut N Make Crafts Privacy & Disclosure Policy
    • Disclaimer
  • JOIN THE SVG SUPERSTAR WAIT LIST

Jav Sid

SVG Business Coach

  • Home
  • SVG Business Podcast
    • Ep: 1 Why Sell SVG Cut Files
    • Ep 2: From a full-time nurse to an SVG designer – Farren Celeste
    • Ep 3: 400+ Sales in 4 months – Find out the secret to Emma’s success
    • Ep 4: No. 1 Thing You Need to Succeed in SVG Business
  • Designing SVGs
    • 3 COSTLY SVG Mistakes to Avoid – Cricut Crafts
    • 5 Epic Reasons to Create Your Own SVGs
  • Free SVG Files
  • Cricut
    • FREE Beginner’s Cricut Course
    • Cricut Tips
      • Vinyl Tips
        • MUST-HAVE The Ultimate Life-Saver Vinyl Guide for Beginners
        • Different Types of Vinyl and How to Use Them
        • How to use heat transfer vinyl for Cricut
        • How to Keep Iron-on Transfers from Peeling
        • 5 Terrible Iron-on/HTV Mistakes to Avoid – Tips for Iron-on Transfers
        • How to Layer Vinyl in Cricut Design Space
        • 9 UNIQUE Heat Transfer Vinyl Projects to Try
      • Cricut Design Space Help
      • 9 Must-Have Everyday Objects for Cricut Owners
      • Convert Picture to SVG – 3 Quick and Easy Methods
      • Cricut Print and Cut Basics for Beginners + FAQs
      • A Complete Guide to Cricut Blades for Beginners
      • 30+ Cricut Tips for Beginners for the Best Cut
      • Ultimate Beginner’s Guide to Cricut Tools
      • Ultimate Guide to Cricut Mats for Beginners
      • Lesson 1: Cricut Introduction and Set-Up
      • A Beginner’s Guide to Design Space
    • Cricut Crafts for Beginners
      • Birthday Crafts
        • DIY Hand-lettered Cake Topper (Cricut)
      • Cricut Flowers
        • EASY Giant Paper Gerbera Daisy Template FREE SVG
        • DIY Rose Paper Flower Bouquet – FREE SVG for Cricut
        • EASY Crepe Paper Sunflower FREE SVG+TEMPLATE
      • Cricut Felt Projects
        • Cute Felt Frog Craft [Template+SVG Free]
        • Cute DIY Felt Pencil Toppers [FREE SVG]
        • Cute DIY Felt Cloud Wall Hanging [FREE SVG]
      • Cricut Kids Crafts
        • Paper Popsicle Craft [FREE SVG + PDF]
        • Super-Cute Turtle Paper Craft for Kids [FREE SVG+PDF]
        • Paper Plate Fox Cricut Craft for Kids [FREE SVG]
        • Must-Have Supplies for Cricut Beginners
        • How to Write with Cricut: Ultimate Guide
        • FREE Graduation Card SVG File + Intricate Cut Tips + Tutorial
      • Cricut Vinyl Projects
        • 4th of July Mason Jars with Patriotic SVG (FREE)
        • DIY Vinyl Mug Cricut Gift for Teachers
        • How to Make a Custom Tea Towel with Cricut
        • Cricut Mason Jar Labels DIY – FREE SVG
        • DIY Car Ornament-Cricut Maker Wood Project
        • How to Layer Vinyl in Cricut Design Space
      • Fall Crafts
      • Graduation Crafts
      • Home Decor
        • DIY Welcome Tile with Cricut [FREE SVG]
      • Mother’s Day Crafts
        • Free Mother’s Day SVG – Gift Box Tutorial
      • Unicorn Crafts
        • DIY Unicorn Bookmark Using Cricut
        • DIY Unicorn Hair Clips – FREE SVG
        • DIY Unicorn Paper Clips – Beginner Cricut Project
        • How to Make a Unicorn Birthday Banner – FREE SVG
      • Wedding Crafts
        • FREE Wedding Card SVG File + Tutorial
        • Wedding Themed Lantern FREE SVG
  • Cookie Policy (EU)

How to create a layered image on Cricut

September 5, 2020 by Sumayyah Khan

Jump to Tutorial Print Tutorial

In this post, you will learn How to create a layered image on Cricut. This tutorial is perfect if you are looking for how to make multi-layer vinyl decals.
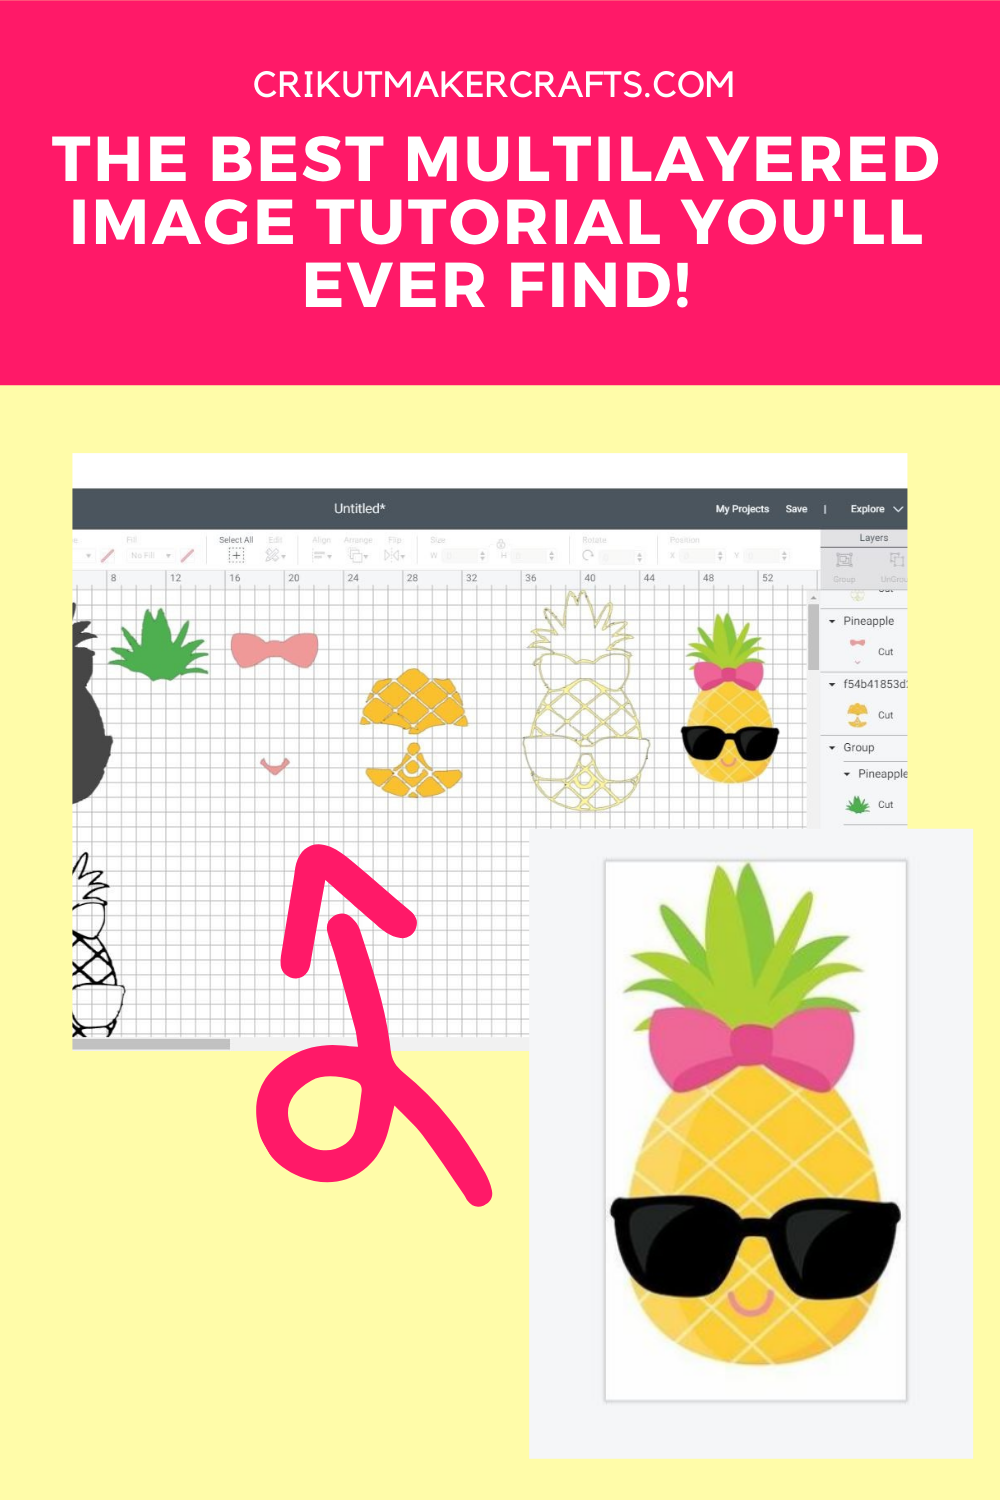
Hey, Cricut buddies! Welcome to Cut N Make Crafts! I’m Jav and today’s I’m sharing steps on how to create a layered image on Cricut.

Table of Contents

  • How to create a layered image in Cricut Design Space
  • Steps for: how to create a layered image in Cricut Design Space
    • Instructions 
    • Notes
  • The End

How to create a layered image in Cricut Design Space

Using a multi-layered image is a great way of utilizing your Cricut machine to its full potential. Multi-layered images can be used for cutting out different colors of vinyl to use on tumblers or for creating a tee using iron-on vinyl. 

When you have multiple layers, you can choose a different color of vinyl for each layer, you can also jazz up the game a bit by adding glitter or sparkly holographic vinyl to one layer. 

Multiple layers can also be helpful in creating 3D multilayered artwork like this one: FREE LAYERED SVG FILE + 3D Layered Art Tutorial.

The first step to creating a multi-layered image on Cricut Design Space is to upload an image. I would recommend using a .png or .jpg image. When finding an image, make sure to check if it has a personal or commercial license. A commercial license is needed to sell the image. 

Steps for: how to create a layered image in Cricut Design Space

Sumayyah Khan
Learn how to create a layered image in Cricut Design Space.
Print Tutorial

Instructions
 

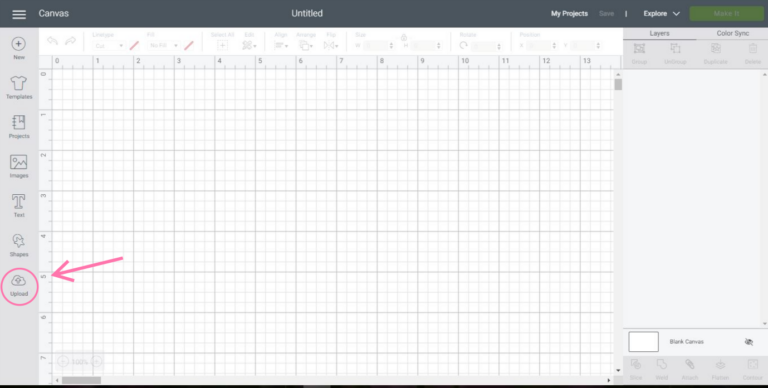
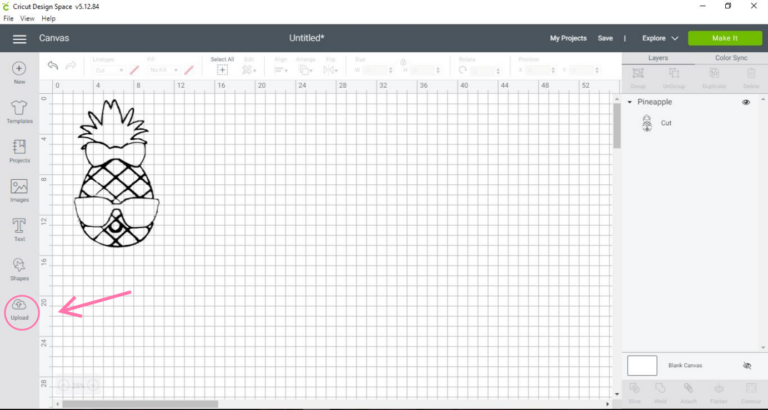
  • Start Cricut Design Space and open a new project. Then click ‘upload’.
  • Once the page opens, click ‘upload image’.
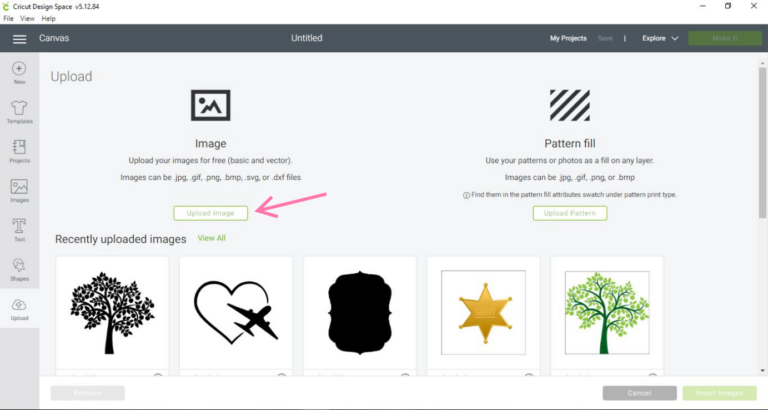
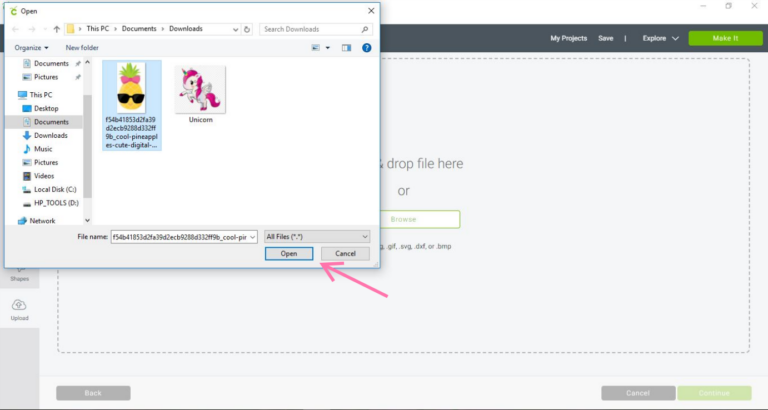
  • An image file can now be dragged and dropped or can be browsed. Select an image and click ‘open’.
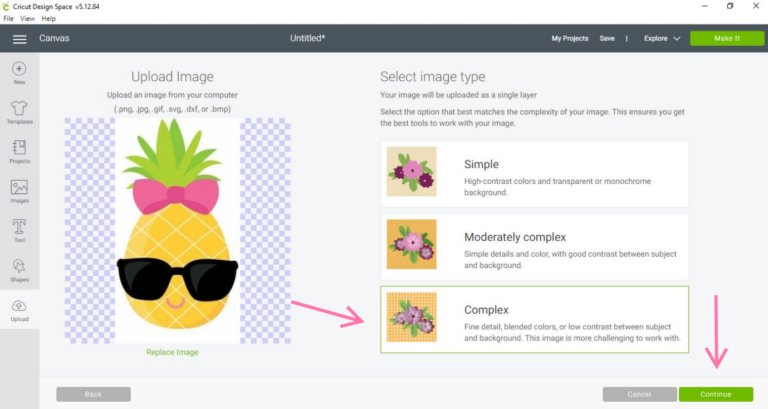
  • Once the image is uploaded, three options will appear to determine the type of image. Now this depends on your image, but a lot of the time images can fall into the ‘simple’ category. However, I would recommend choosing the ‘complex’ category to be safe. Press ‘continue’ to move forward.
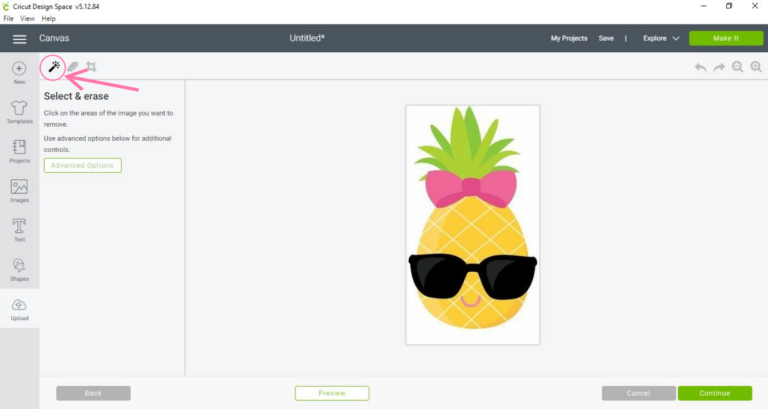
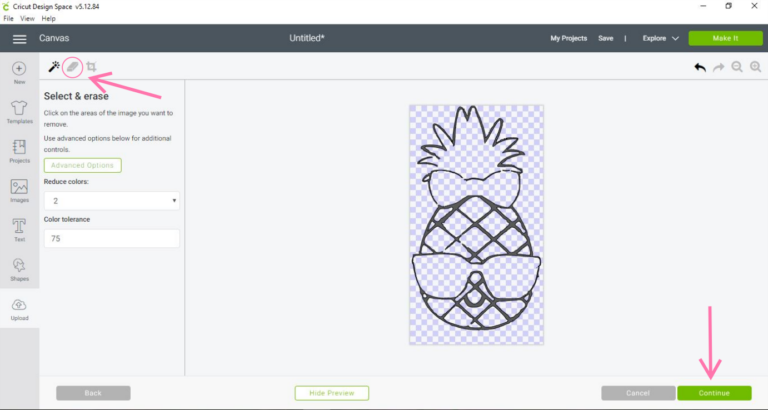
  • Click on the ‘select and erase’ wand and erase the background and all the colours.
  • You want to be left with a solid black outline of the image.
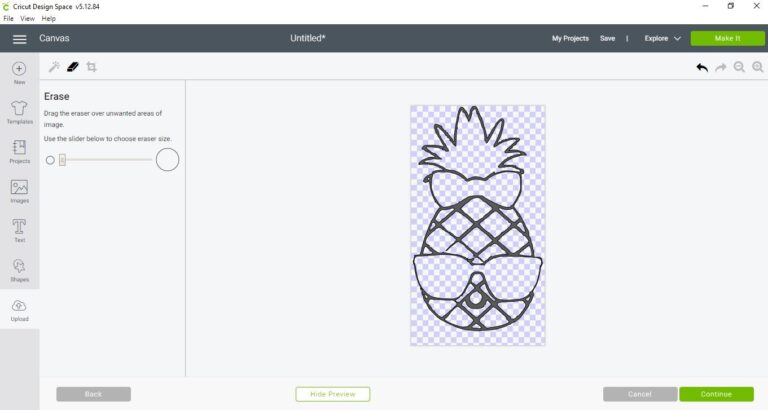
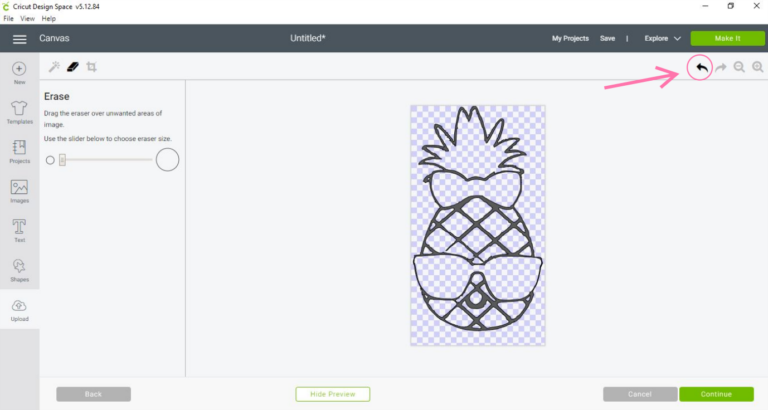
  • Press the undo symbol if the outline was accidently selected.
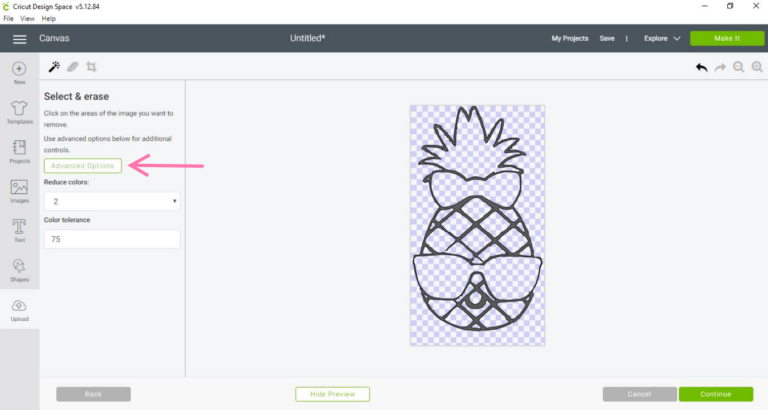
  • If you see that the outline has harsh edges, press on ‘advanced options’. You can adjust this how you like but I recommend reducing the colour to 2 and increasing the colour tolerance to range between 25 to above 50. This helps in cleaning up the image and making the edges smooth. If necessary, press ‘undo’ and then use the ‘select and erase’ wand from the steps above to remove the background and colours again.
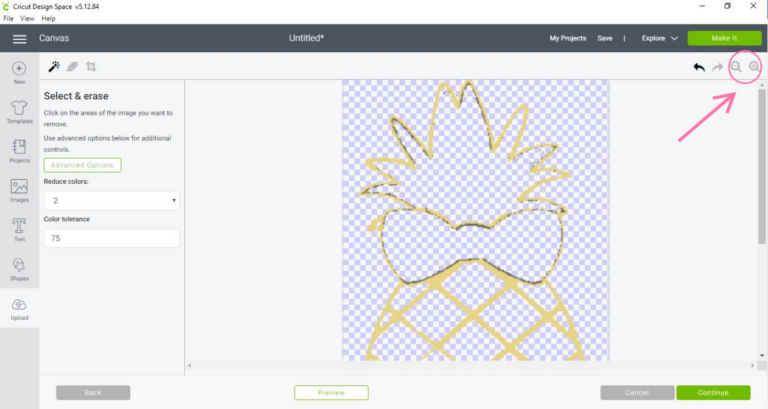
  • Use the zoom in and out buttons to help see tiny details.
  • Press ‘preview’ to see if the image is clean without any harsh edges.
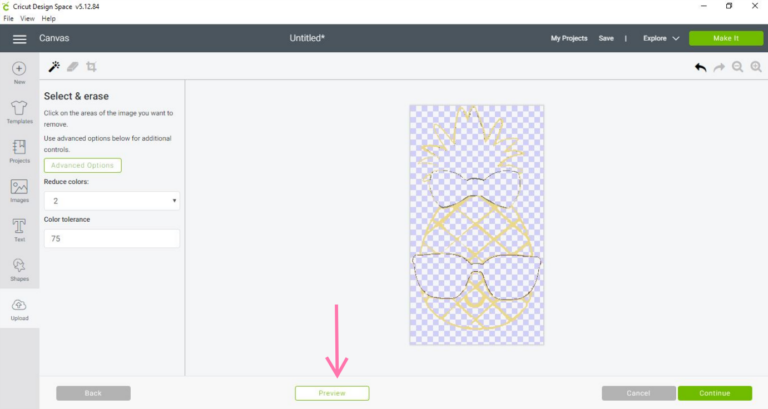
  • If there are lines or dots that are around the image, use the ‘erase’ tool to remove them and then press ‘continue’.
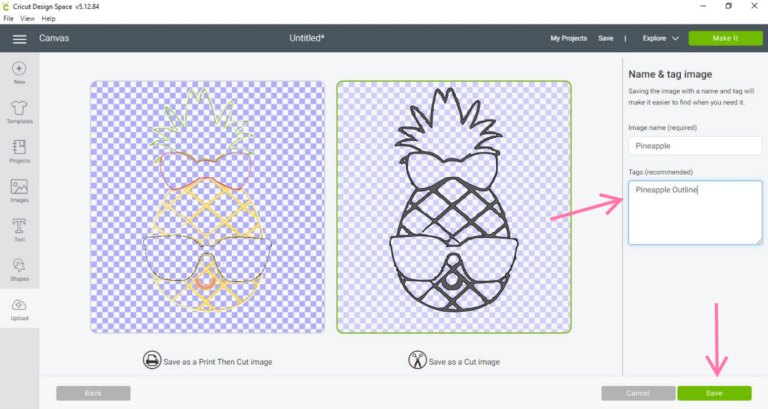
  • Save as a cut image. Along with adding a name to your image, add a few tags so it is easy to search through your images later.
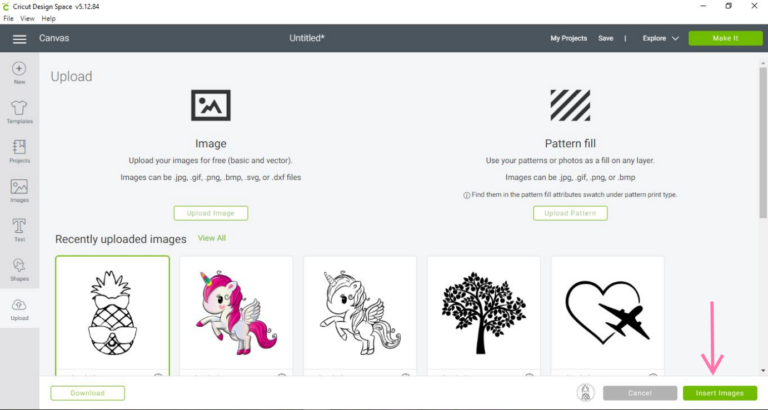
  •  Insert the image into Design Space by clicking on the image and pressing ‘insert images’.
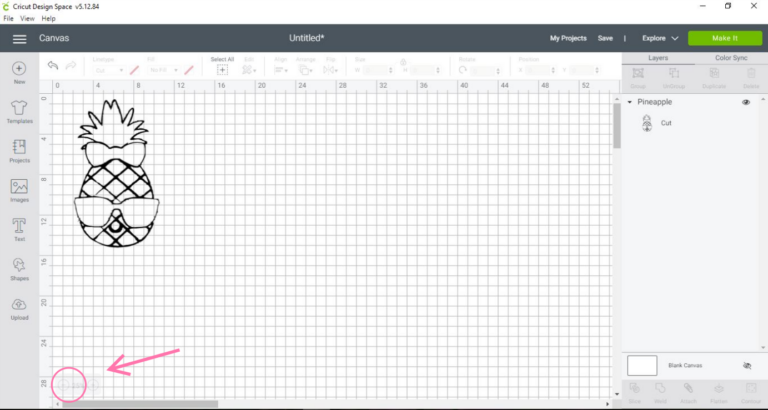
  • Now your image is on the canvas. Zoom out to 25% to make your canvas bigger. Since there is only one layer, we need to create more to get a multi-layered image.
  •  Press ‘upload’ and upload the same image again.
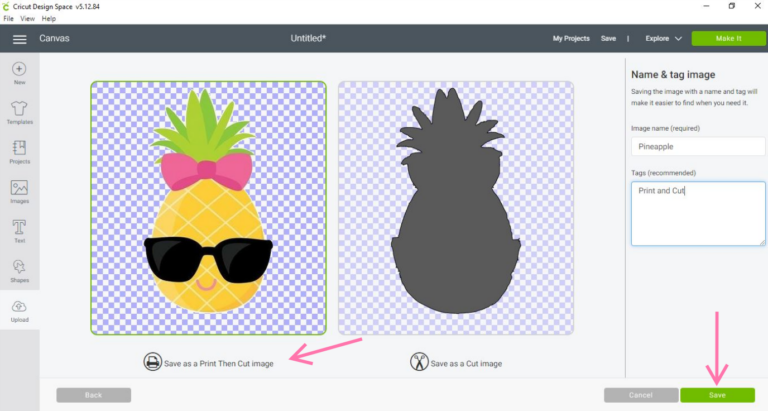
  • This time upload it as a ‘print then cut’ image. This allows you to reference the colours of the image easily when creating the layers. You do not need to change the advanced options or remove the colours. Instead, only remove the background. This image can be deleted once all the layers are complete.
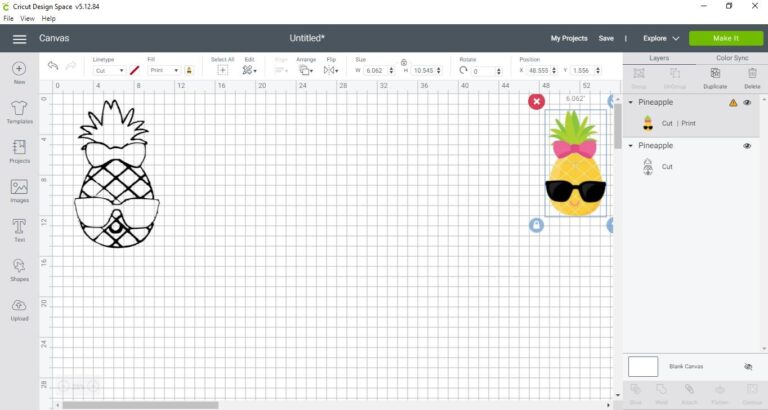
  • After saving as a print the cut image, insert it into Design Space and place it in a corner of the canvas. It won’t be used until later on.
  • Now, duplicate the first image uploaded that has only the outline and drag it to the bottom left corner. This allows you to see your image in the upcoming steps.
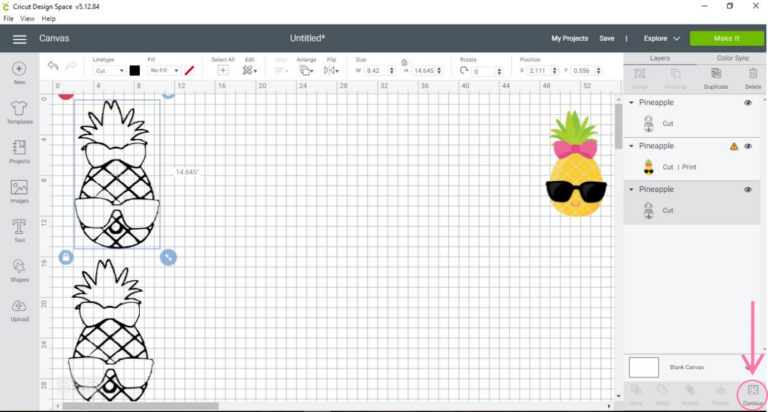
  • Press ‘contour’ and a box will appear.
  • Click on ‘hide all contours’, which causes all the parts of the image to be deselected and only the filled outline will show. This will act as the base for your image once cut out.
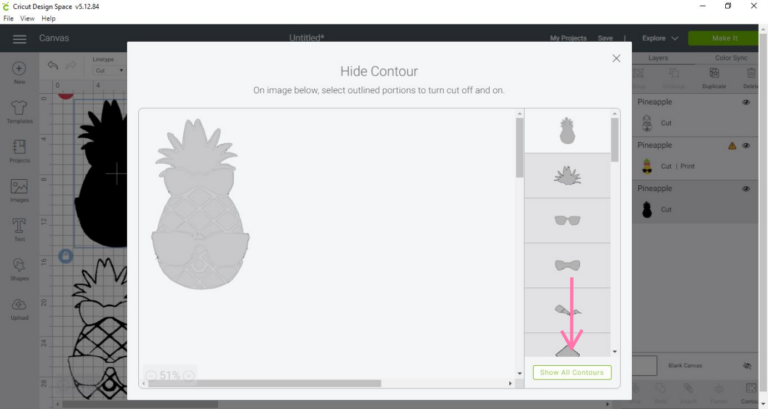
  • Press back onto the canvas and duplicate the filledin image once again.
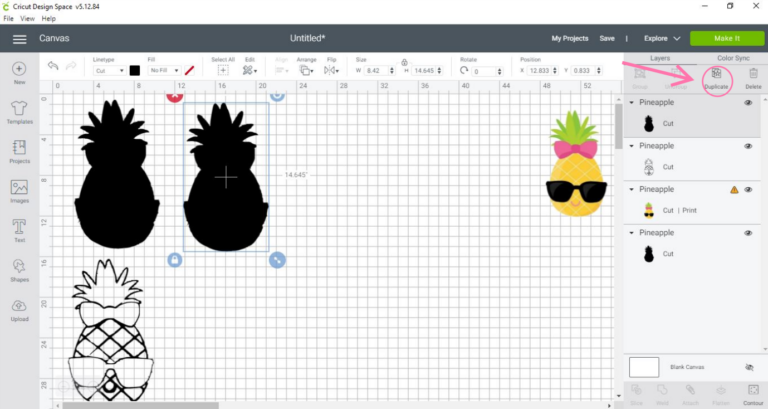
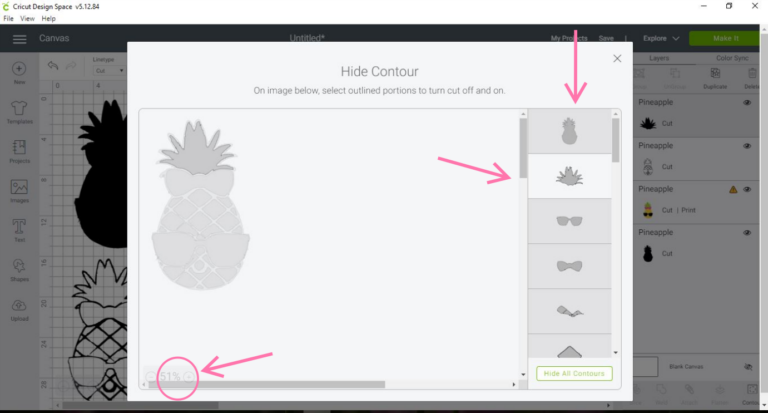
  • Press ‘contours’ again. By referencing the coloured print then cut image, select all the parts of one colour by pressing on the pieces. For instance, I will be clicking on all the parts that have to be green. In this case, it is the leaves of the pineapple. You can zoom in to see the image clearly. If you accidently click on another piece, click on it again to deselect it. Deselect the filled outline and click out of the box.
  • Change the colour of the image you just created to the reference colour.
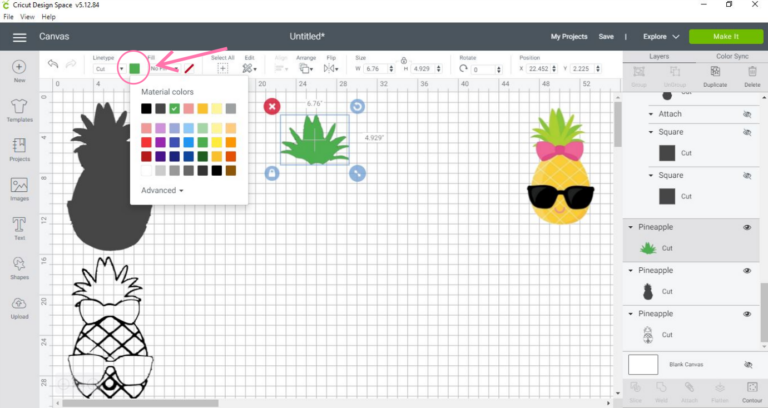
  • Then duplicate the original filled in image as many times as necessary to do the same with all of the other colours. For example, 5 colours will account for 5 layers altogether. In this case, I have duplicated it 3 more times since I already have one green layer and one base black layer. Once all of the layers are contoured, check in the layers panel to confirm.
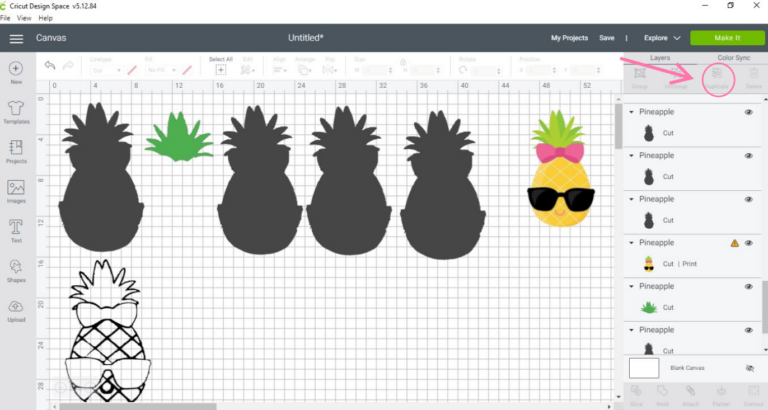
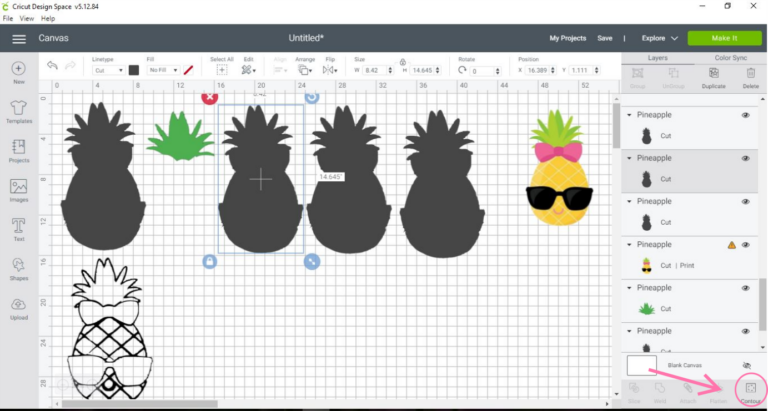
  • Let’s go through one more layer. Select one of the duplicated shapes and press ‘contour’.
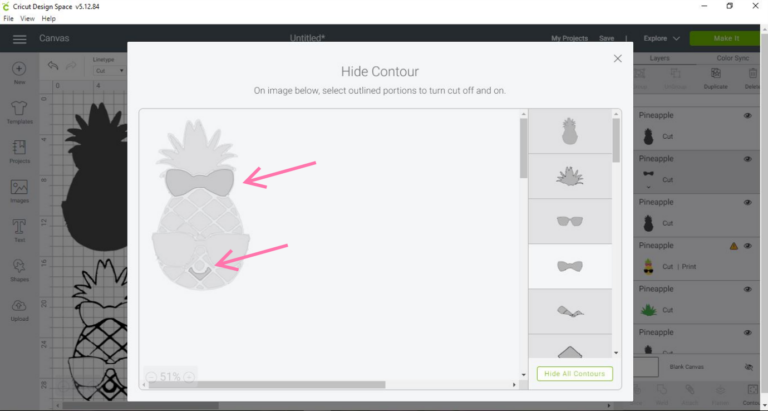
  • For this layer, I am going to choose all the parts that will be pink. In this case, since the bow and smile are going to be pink, I will remove all the parts that are of different colours. For this example, I don’t mind the shadow of the bow, not being there, so I am keeping it the same shade of pink. It depends on your preference.
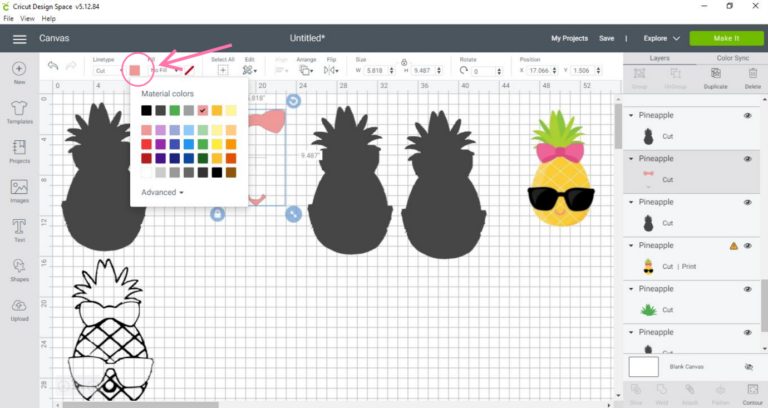
  • Click out of the box and change the colour of the layer. In my case, it is pink.
  • Do this same procedure for all the other layers.
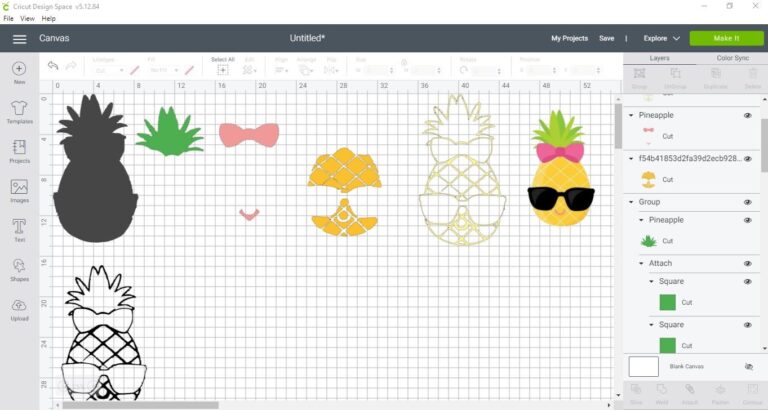
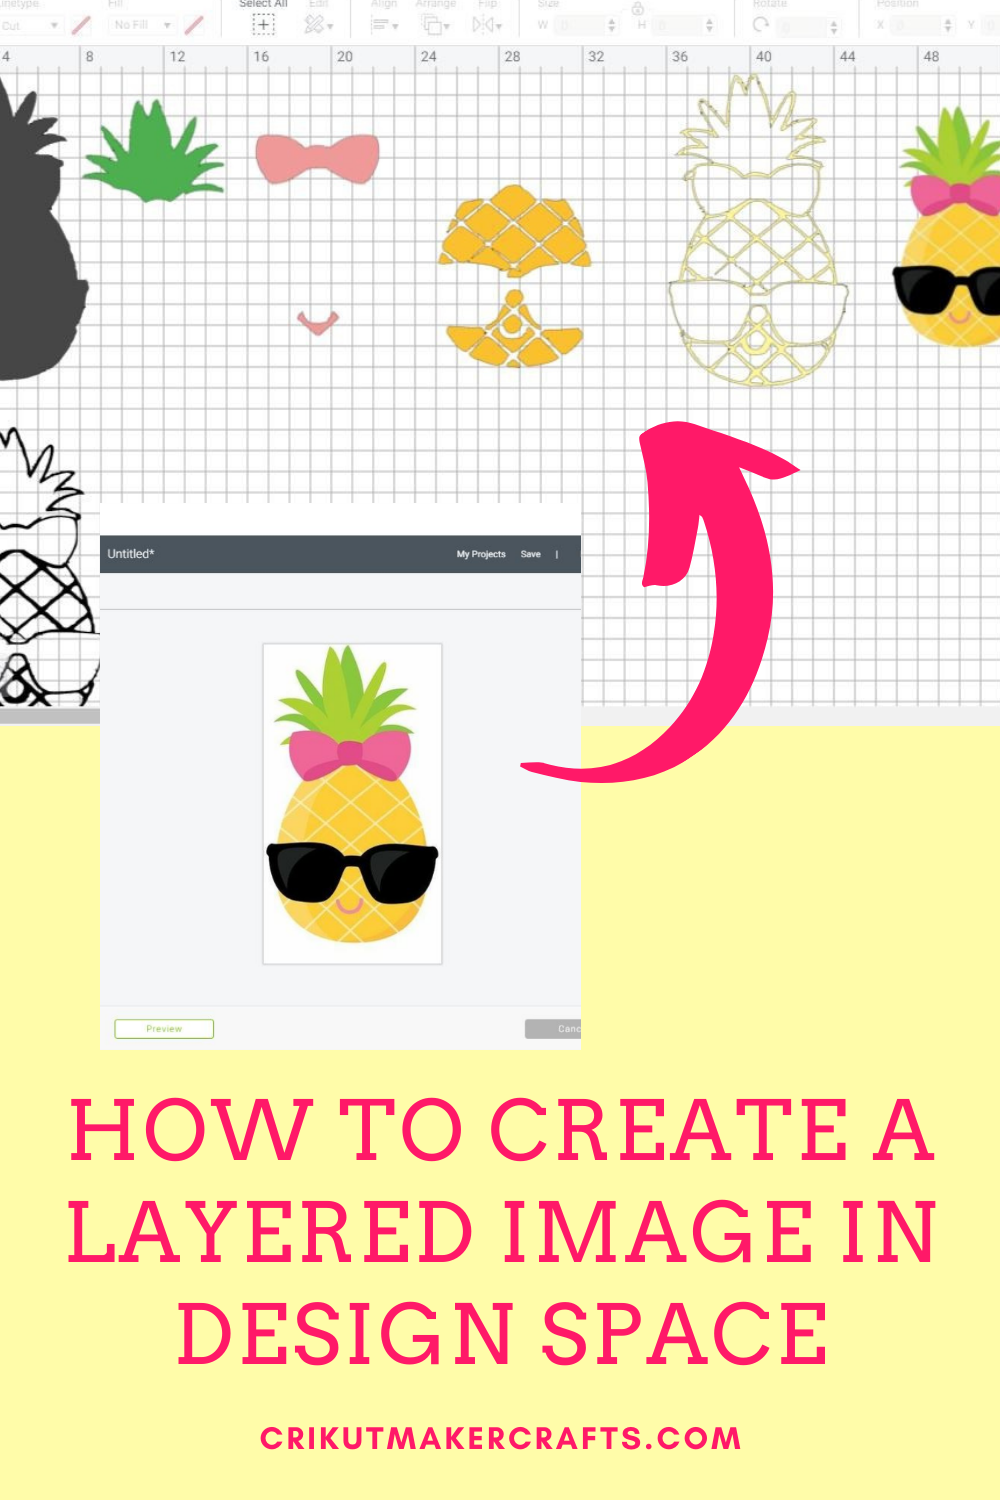
  • You can now put all the layers on top of one another to create your desired image. This also helps determine if you have missed any layer or piece. It is okay if the layering is slightly off since this is a digital version of your image.
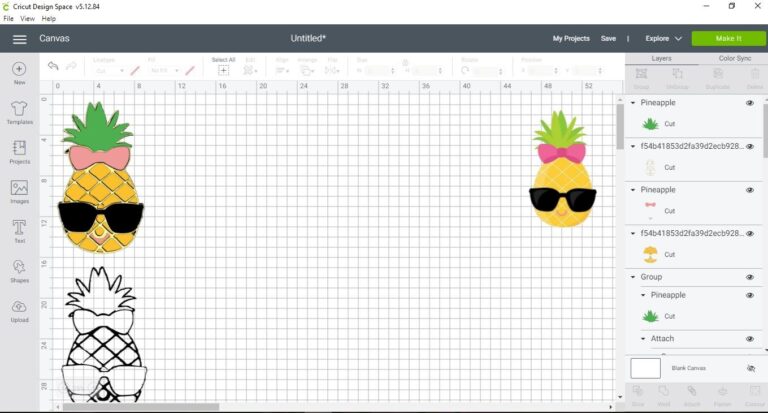
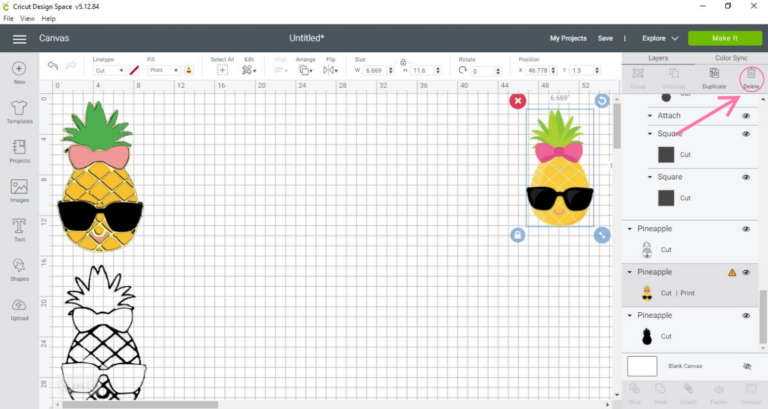
  • Compare with the reference image and once the same, delete the reference image. It is alright if your colours are not exactly the same as the original image since the shade of your material may be different.
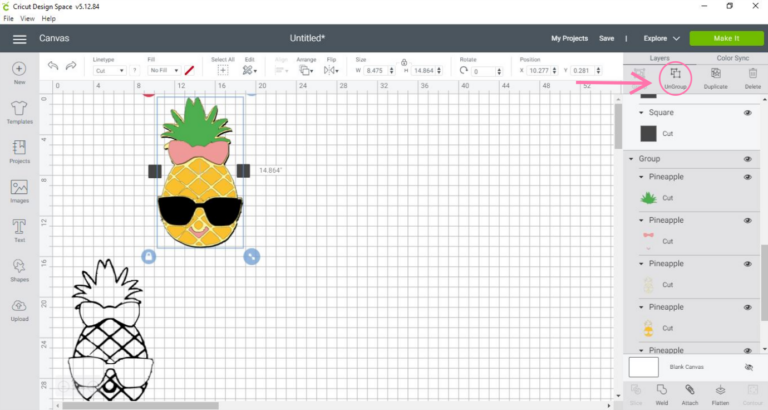
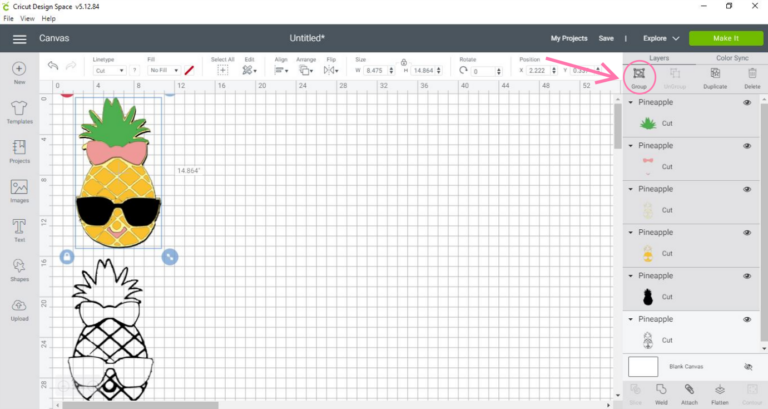
  •  Select the layers and ‘group’ them together and adjust the size if need be.
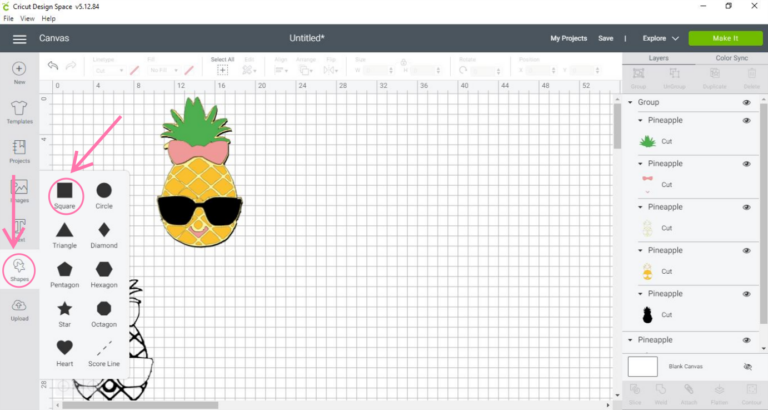
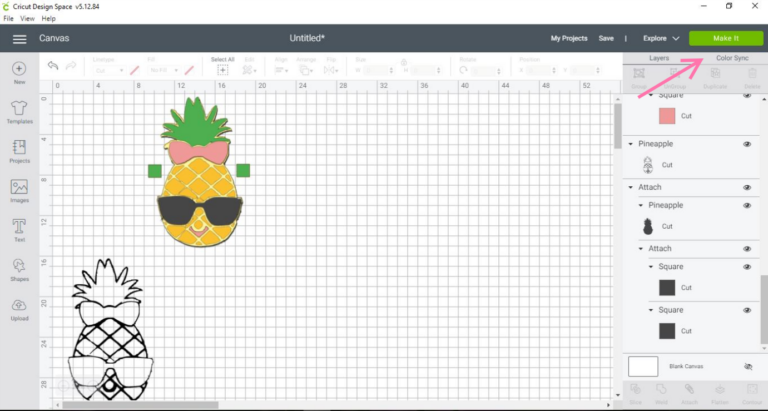
  • If you will be working with vinyl, a great tip is to add registration marks on either side of your layered image which will assist in layering it once cut out. Press ‘shapes’ and click the square button.
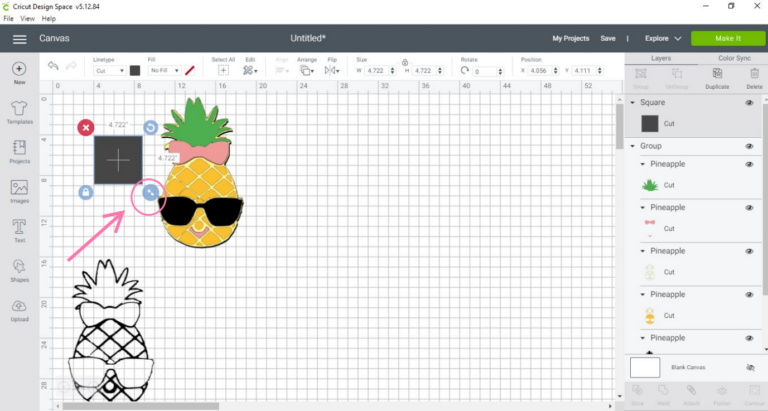
  • Change the size of the square to be smaller than the image by using the dual arrow button.
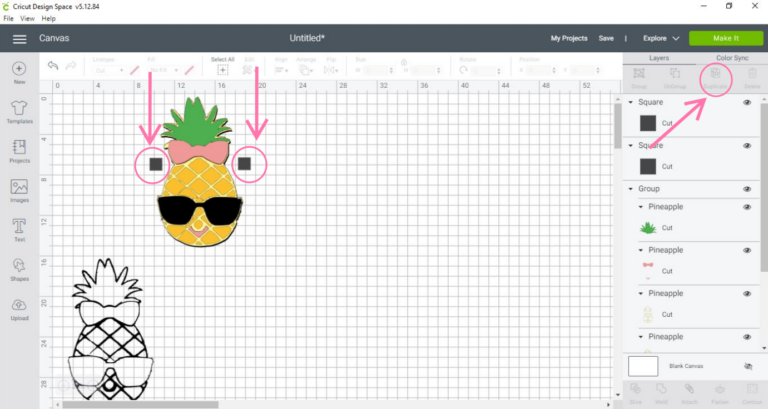
  • Duplicate it and place these squares on either side of the image
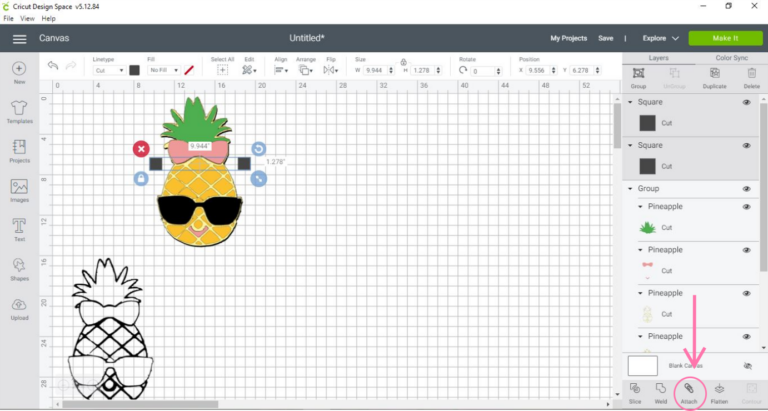
  • Select the squares and ‘attach’ them together.
  • Duplicate the squares for how many layers you have. For instance, 5 layers calls for 5 sets of squares.
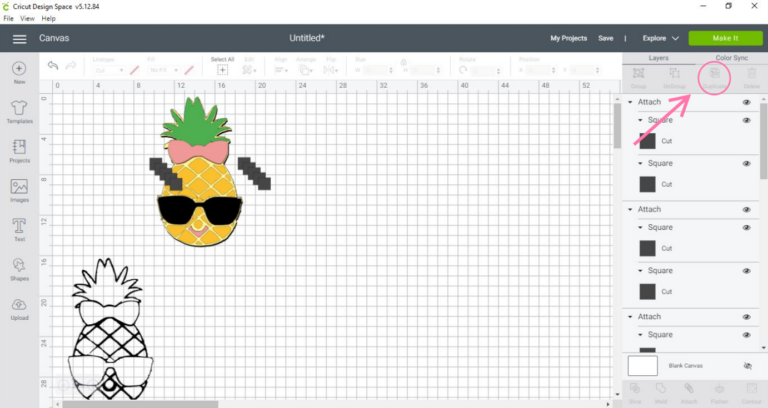
  • After duplicating your squares, align and center them. If they move, move them back to where you originally placed them.
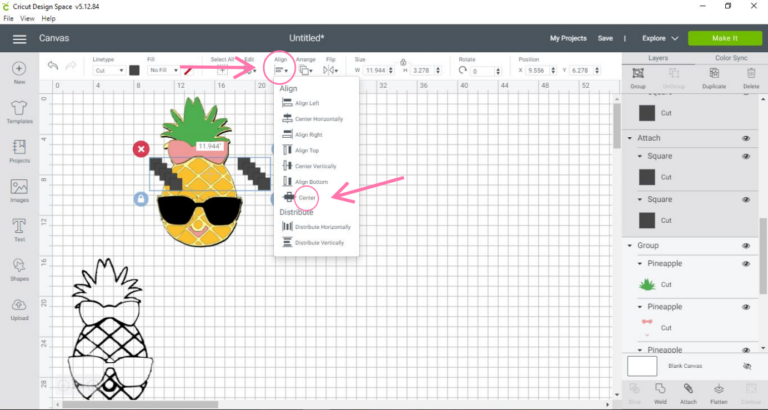
  • Ungroup your layered image.
  • Then take one set of squares and attach it to one layer. Do the same for all the layers and squares.
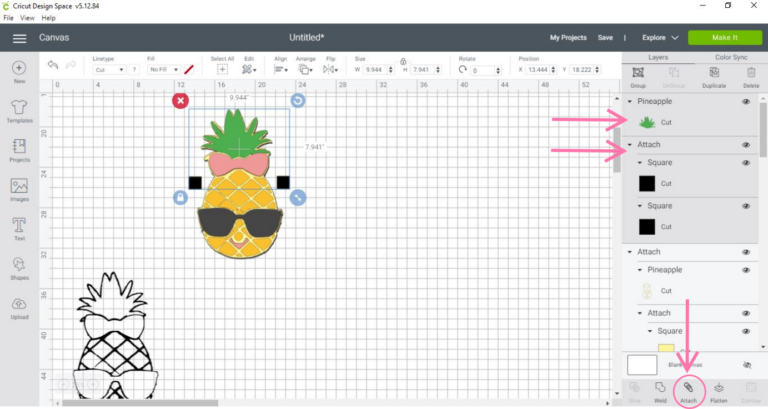
  • Change the colours back to what they were before and make sure each layer has a set of squares.
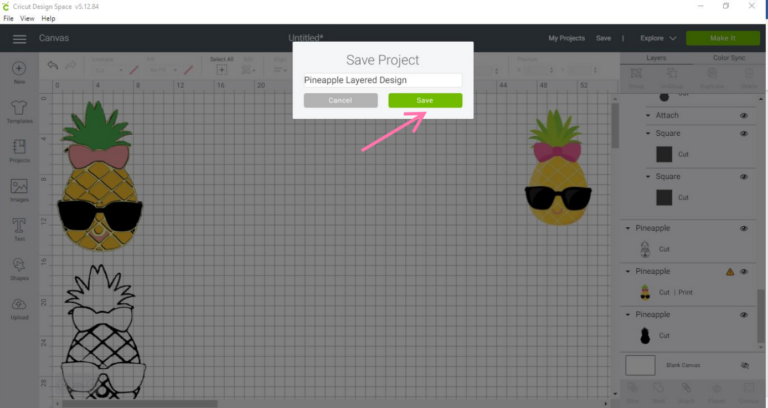
  • Don’t forget to save your project so you can edit or cut it out if you need it later.
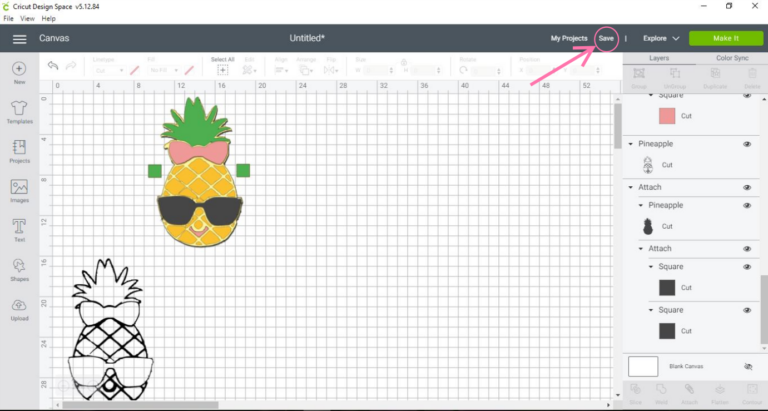
  • Add a name and press ‘save’.
  • Now we are ready to cut our image. Click on ‘make it’.
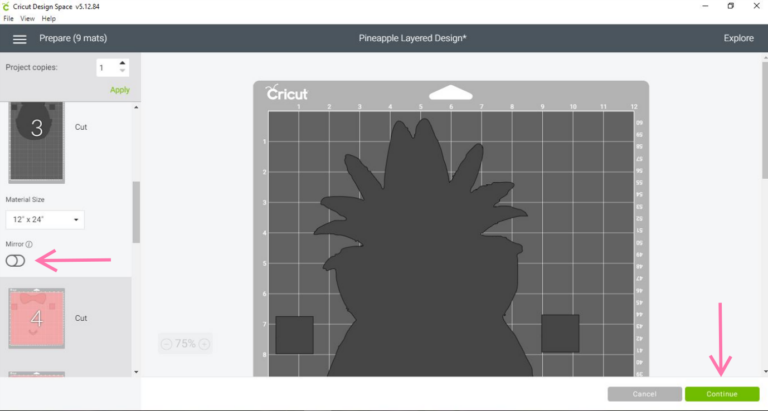
  • There should be a mat for each colour you are using. If you are using heat transfer vinyl (HTV or iron-on), mirror each of your mats. If you are using adhesive vinyl, you can leave it unchanged. Then press ‘continue’.
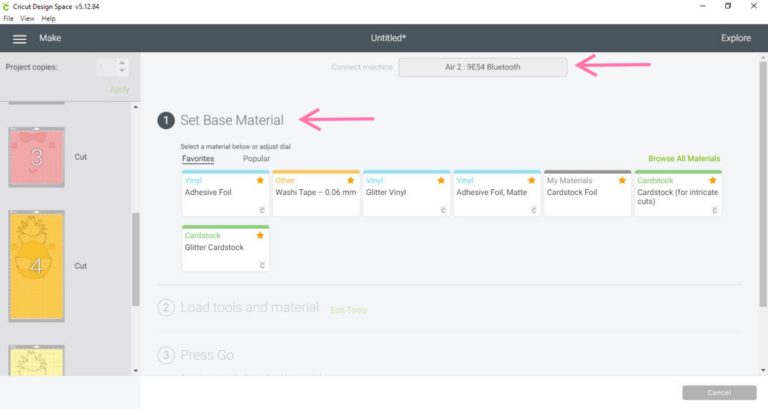
  •  Choose your Cricut device, material setting, and you’re all set to cut this multi-layered image!
Notes

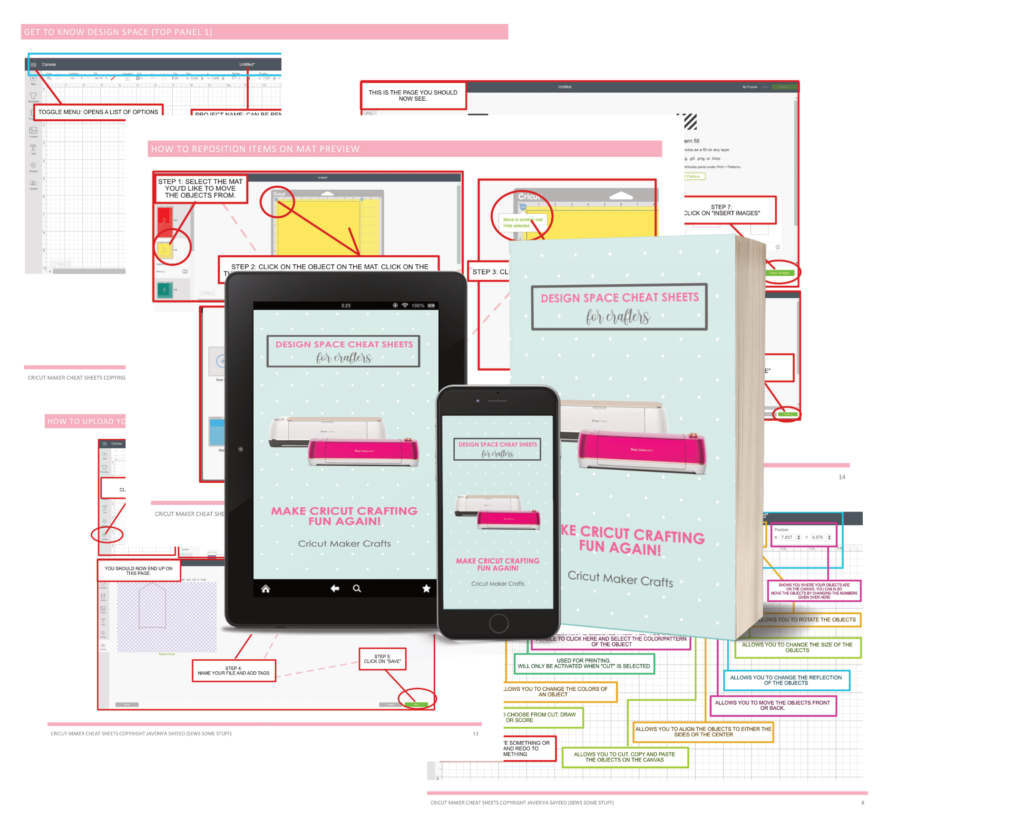
MASTER DESIGN SPACE! GET THE DESIGN SPACE CHEAT SHEETS FOR BEGINNERS!
cricut cheat sheets for crafters

The End

With that, we have reached the end of the tutorial where you learned How to create a layered image on Cricut. 

Check out more Design Space tutorials below:
  1. DIY Business Cards in Design Space (So Cute)
  2. How to Layer Vinyl in Cricut Design Space

This post was contributed by CraftYourMemoriess. You can also find her on her Etsy store: CraftYourMemories
Related Posts:

  • Cricut Print and Cut Basics for Beginners + FAQs
    Cricut Print and Cut Basics for Beginners + FAQs
  • DIY 3D Owl Mandala + 3D Layered SVG [FREE]
    DIY 3D Owl Mandala + 3D Layered SVG [FREE]
  • 99+ Free Cricut Projects for Beginners
    99+ Free Cricut Projects for Beginners
  • A Complete Guide to Cricut Blades for Beginners
    A Complete Guide to Cricut Blades for Beginners

Filed Under: Cricut Design Space Help Tagged With: design space

Previous Post: « Owl Luminary Tutorial + FREE SVG
Next Post: How to Resize an Image in Cricut Design Space »

Reader Interactions

Trackbacks

  1. How to find uploaded files in Cricut Design Space using filters says:
    September 9, 2020 at 9:49 am

    […] How to create a layered image on Cricut […]

  2. How to delete uploaded images in Cricut design space says:
    September 13, 2020 at 2:27 pm

    […] How to create a layered image on Cricut […]

Primary Sidebar

Recent Posts

  • Mother’s Day Sublimation Designs for T-shirts
  • DIY Penguin Mug Holiday Decor
  • EASY Holiday Cake Topper Tutorial
  • Super Easy Felt Unicorn Ornament SVG + Tutorial
  • 99 Ideas for DIY Ornaments – So Easy and Fun

Amazon Affiliates Disclosure

Cut n Make Crafts is a participant in the Amazon Services LLC Associates Program, an affiliate advertising program designed to provide a means for sites to earn advertising fees by advertising and linking to Amazon.com.

Footer

cutnmakecrafts

Jav | SVG Business Coach
🚨FREE CLASS🚨👇 comment below for the detai 🚨FREE CLASS🚨👇 comment below for the details 👇
.
.

#svg #svgfiles #svgfile #svgcuttingfiles #svgcuts #svgdesigns #svgcutfiles #svgfileforcricut #cricutmade #cricutmaker
🚨HOW TO USE MASCULINE AND FEMININE ENERGIES FOR 🚨HOW TO USE MASCULINE AND FEMININE ENERGIES FOR A SUCCESSFUL BUSINESS with Chelsea from @yourroutinequeen 
.
.
Join me and Chelsea for an enlightening conversation around the different types of energies and how to use them to create a successful business that also makes you happy!
.
💎For more tips and resources be sure to visit @yourroutinequeen 
.
.
.

👉👉Follow @cutnmakecrafts for more inspiration 
.
.
#cricutprojectsuccess #cricutmadecrafts #cricutmadegift #cricutmakercrafts #cricutmademedoit #cricutproject  #cricutmaker #cricut #cricutmade #designisinthedetails #cricutexploreair2 #svgcuttingfiles #svgfiles #svg #svgdesigns #cricutprojectsuccess #cricutteacher #cricutmachine #cricutcrafting #cricuteasypress #cricutcraft #cricutdesignspace #crikutmakercrafts
🚨 SAVE THE DATE 🚨 join me and Chelsea from @ 🚨 SAVE THE DATE 🚨 join me and Chelsea from @yourroutinequeen as we chat about how to use your masculine and feminine energy to build your online business.
.
💎 click on the bell icon to set a reminder when we go live!
.
💕 join us live and get your questions answered
.
.

👉👉Follow @cutnmakecrafts for more inspiration 
.
.
#cricutprojectsuccess #cricutmadecrafts #cricutmadegift #cricutmakercrafts #cricutmademedoit #cricutproject  #cricutmaker #cricut #cricutmade #designisinthedetails #cricutexploreair2 #svgcuttingfiles #svgfiles #svg #svgdesigns #cricutprojectsuccess #cricutteacher #cricutmachine #cricutcrafting #cricuteasypress #cricutcraft #cricutdesignspace #crikutmakercrafts
🚨 [IDEAS TO CASH💸💸](NOT FREE) I'm looking 🚨 [IDEAS TO CASH💸💸](NOT FREE)
I'm looking for 3 crafters with full-time jobs who want to make extra cash selling SVG cut files in the next 30 days.
So if you...
1. Are a creative with a FULL-TIME JOB
2. Want to add an extra $3k - $5k to your income,
3. Have time to work 1-2 hours a day starting next week
4. Are friendly and coachable,
5. 🚨IMP: Are in a place to invest in a coach

Comment "SVGs" below and I'll send you a private message with more details...👇
.
.
.

#cricutmademedoit #cricutproject  #cricutmaker #cricut #cricutmade #designisinthedetails #cricutexploreair2 #svgcuttingfiles #svgfiles #svg #svgdesigns #cricutprojectsuccess #cricutteacher #cricutmachine #cricutcrafting #cricuteasypress #cricutcraft #cricutdesignspace #crikutmakercrafts
Load More... Follow on Instagram

Hi, friend! I’m Jav, a research assistant/SVG design coach. I’m here to help you design and sell SVG cut files. Check out my SVG Business Podcast if you want to start your own SVG business!


Cut N Make Crafts Privacy Policy

ARCHIVES

svg business class - how to design and sell SVG cut files

Copyright © 2022 · Sprinkle Pro theme by Restored 316