• About
    • Cut N Make Crafts Privacy & Disclosure Policy
    • Disclaimer
  • JOIN THE SVG SUPERSTAR WAIT LIST

Cut N Make Crafts

Cricut Maker Crafts for Beginners

  • Home
  • SVG Business Podcast
    • Ep: 1 Why Sell SVG Cut Files
    • Ep 2: From a full-time nurse to an SVG designer – Farren Celeste
    • Ep 3: 400+ Sales in 4 months – Find out the secret to Emma’s success
    • Ep 4: No. 1 Thing You Need to Succeed in SVG Business
  • Designing SVGs
    • 3 COSTLY SVG Mistakes to Avoid – Cricut Crafts
    • 5 Epic Reasons to Create Your Own SVGs
  • Free SVG Files
  • Cricut
    • FREE Beginner’s Cricut Course
    • Cricut Tips
      • Vinyl Tips
        • MUST-HAVE The Ultimate Life-Saver Vinyl Guide for Beginners
        • Different Types of Vinyl and How to Use Them
        • How to use heat transfer vinyl for Cricut
        • How to Keep Iron-on Transfers from Peeling
        • 5 Terrible Iron-on/HTV Mistakes to Avoid – Tips for Iron-on Transfers
        • How to Layer Vinyl in Cricut Design Space
        • 9 UNIQUE Heat Transfer Vinyl Projects to Try
      • Cricut Design Space Help
      • 9 Must-Have Everyday Objects for Cricut Owners
      • Convert Picture to SVG – 3 Quick and Easy Methods
      • Cricut Print and Cut Basics for Beginners + FAQs
      • A Complete Guide to Cricut Blades for Beginners
      • 30+ Cricut Tips for Beginners for the Best Cut
      • Ultimate Beginner’s Guide to Cricut Tools
      • Ultimate Guide to Cricut Mats for Beginners
      • Lesson 1: Cricut Introduction and Set-Up
      • A Beginner’s Guide to Design Space
    • Cricut Crafts for Beginners
      • Birthday Crafts
        • DIY Hand-lettered Cake Topper (Cricut)
      • Cricut Flowers
        • EASY Giant Paper Gerbera Daisy Template FREE SVG
        • DIY Rose Paper Flower Bouquet – FREE SVG for Cricut
        • EASY Crepe Paper Sunflower FREE SVG+TEMPLATE
      • Cricut Felt Projects
        • Cute Felt Frog Craft [Template+SVG Free]
        • Cute DIY Felt Pencil Toppers [FREE SVG]
        • Cute DIY Felt Cloud Wall Hanging [FREE SVG]
      • Cricut Kids Crafts
        • Paper Popsicle Craft [FREE SVG + PDF]
        • Super-Cute Turtle Paper Craft for Kids [FREE SVG+PDF]
        • Paper Plate Fox Cricut Craft for Kids [FREE SVG]
        • Must-Have Supplies for Cricut Beginners
        • How to Write with Cricut: Ultimate Guide
        • FREE Graduation Card SVG File + Intricate Cut Tips + Tutorial
      • Cricut Vinyl Projects
        • 4th of July Mason Jars with Patriotic SVG (FREE)
        • DIY Vinyl Mug Cricut Gift for Teachers
        • How to Make a Custom Tea Towel with Cricut
        • Cricut Mason Jar Labels DIY – FREE SVG
        • DIY Car Ornament-Cricut Maker Wood Project
        • How to Layer Vinyl in Cricut Design Space
      • Fall Crafts
      • Graduation Crafts
      • Home Decor
        • DIY Welcome Tile with Cricut [FREE SVG]
      • Mother’s Day Crafts
        • Free Mother’s Day SVG – Gift Box Tutorial
      • Unicorn Crafts
        • DIY Unicorn Bookmark Using Cricut
        • DIY Unicorn Hair Clips – FREE SVG
        • DIY Unicorn Paper Clips – Beginner Cricut Project
        • How to Make a Unicorn Birthday Banner – FREE SVG
      • Wedding Crafts
        • FREE Wedding Card SVG File + Tutorial
        • Wedding Themed Lantern FREE SVG

How to Write with Cricut: Ultimate Guide

July 25, 2019 by Jav

In this post, I’m showing you how to write with Cricut. I’ll also share the steps to find the perfect Cricut writing fonts for your projects. We’re going to learn how to use the Cricut pen and create a simple mandala card.

Did you know, you can also write and draw with your Cricut? Yep, Cricut is not just designed for cutting, it can write and draw for you as well. Think custom art prints and tags with custom handwritten scripts. Isn’t that awesome! Let’s get started!

In this post, I'm showing you how to write with Cricut. I'll also share the steps to find the perfect Cricut writing fonts for your projects. We're going to learn how to use the Cricut pen and create a simple mandala card.

Before we begin, I just wanted to ask you, have you ever had a deal disappear from you right under your nose? Happens a LOT with me on Facebook Marketplace. I swear. Some of the stuff listed are of such AMAZING prices that they disappear within minutes.

Yesterday, I was looking for some Neoflam pans on their website. They’re quite pricey so I thought I’d look for a second hand one. That’s when I hopped onto marketplace to try out my luck. The chances of finding the pans was extremely low but to my surprise, someone had listed an entire set for A$80 just 12 minutes earlier. Usually, the set retails for about $400. I messaged the person to ask about the location and guess what, by then it was already GONE! *wails*

Have you ever had any such experience? Let me know in the comments below.

Also, we finally finished the whole movie that I told you about in my previous post. The movie made me realize one thing, success is NOT easy. It takes a LOT of hardwork and sleepless nights and not to forget, failures. I reckon, this movie is the reason I got my working mo-jo back. 

If you’re a creative entrepreneur going through a phase in life, where you have absolutely no motivation to work, I highly recommend watching the movie. Trust me, you’re going to LOVE it.

Alright, onto today’s tutorial where I’m showing you how to write with your Cricut. 

Table of Contents

  • How to Write with Cricut?
    • Step 1: Add Text
    • Step 2: Change Linetype
    • Step 3: Choose Font
    • Step 4: Choose Pen
    • Step 5: Attach and Send to Mat
    • Step 6: Add your pen
  • Where to Use the Writing/Drawing option?
    • Supplies Needed to Write with Cricut
  • Video Tutorial: How to Write and Draw with Cricut
  • Best Cricut Writing Fonts
  • Pens Perfect for Writing with Cricut
  • How to Write with ANY PEN with Cricut
  • Writing with Cricut FAQs
    • Can I write with pens other than the Cricut brand?
    • Which fonts are the best?
    • Can you write full letters or is it just going to be an outline?
  • The End

How to Write with Cricut?

The process of writing with Cricut is pretty simple. All you need is a pen, cardstock you’d like to write on and your image or text. One thing to keep in mind is to change the linetype from “draw” to “cut” as this signals your Cricut to draw/write instead of cutting. Here are the steps involved in writing with Cricut.

Step 1: Add Text

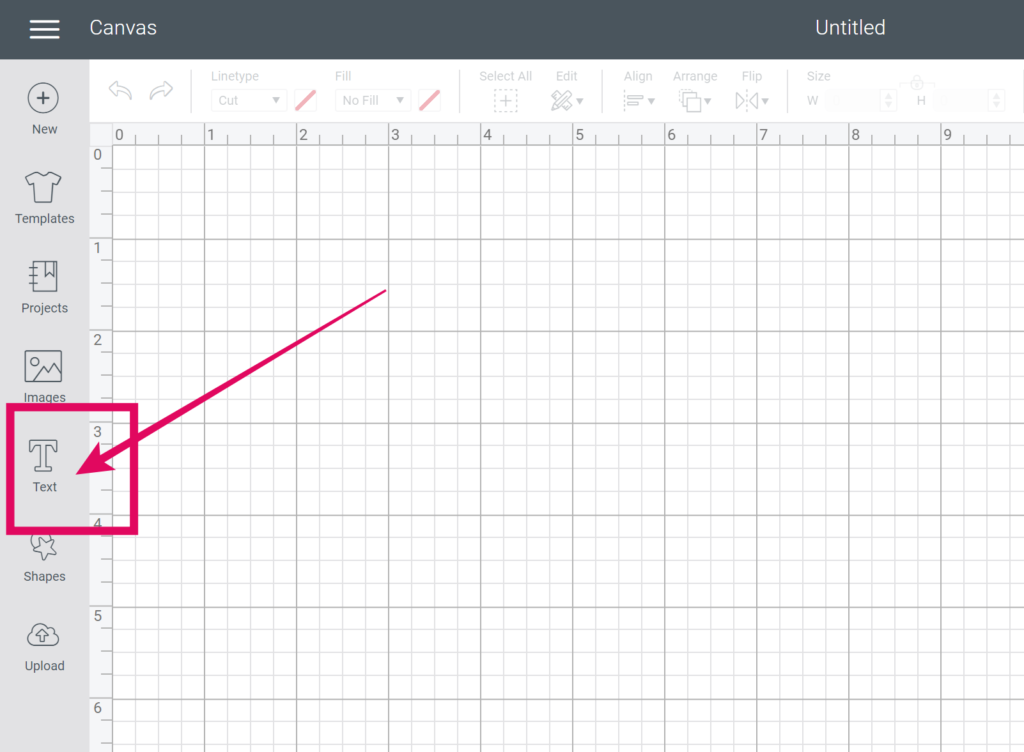
First, open up Design Space by going to design.cricut.com and then click on canvas from the menu on the left-hand side.

Once you’re on the canvas, click on the “text” option from the left-hand side panel. Once you click on “text”, a box will pop up for you to add your text in.

Insert your text in the text box. Use the text editing options from the text edit panel to edit your text. You can reduce the text spacing, make the text curved, change the alignment or the font size as I showed you in the third lesson of Beginner’s Cricut Course.

Step 2: Change Linetype

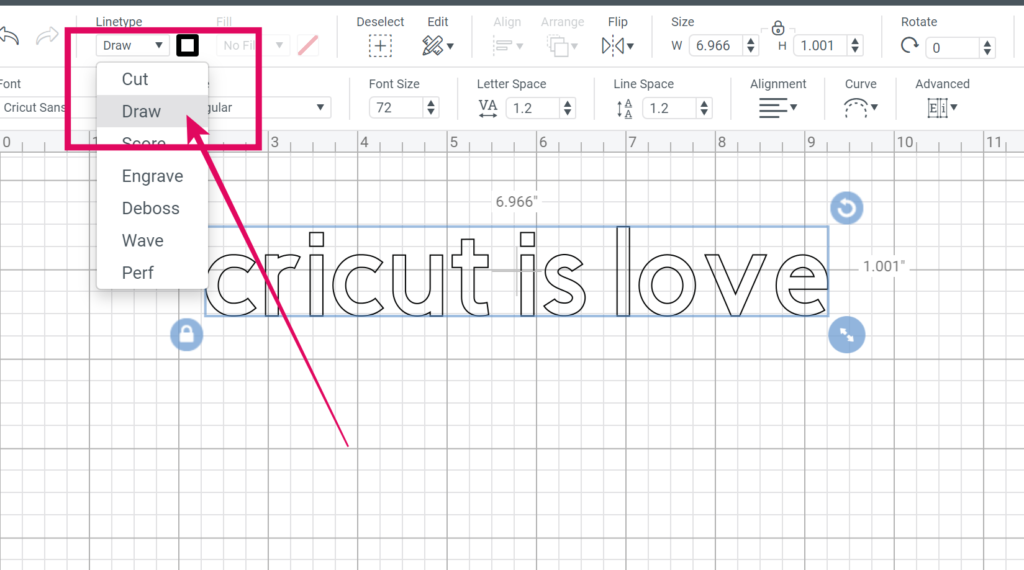
Once you’re happy with your text, you can change the “linetype” from “cut” to “draw”. This will signal your machine to draw instead of cut so don’t forget this essential step.

Step 3: Choose Font

Next, it’s time to choose the font. Do note that not ALL FONTS are designed for writing. To write, you need to use some special fonts which you can either purchase from Cricut or you can get some of the free ones from the list I shared below.

To use the Cricut fonts, click on “Cricut” from the font menu, next, click on “filter” and then select “writing” from the dropdown menu.

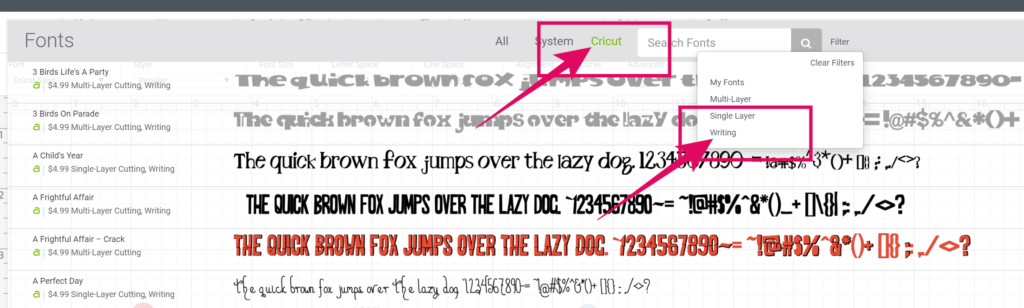
This will give you a complete list of fonts that can write for you instead of creating the outlines for the texts.
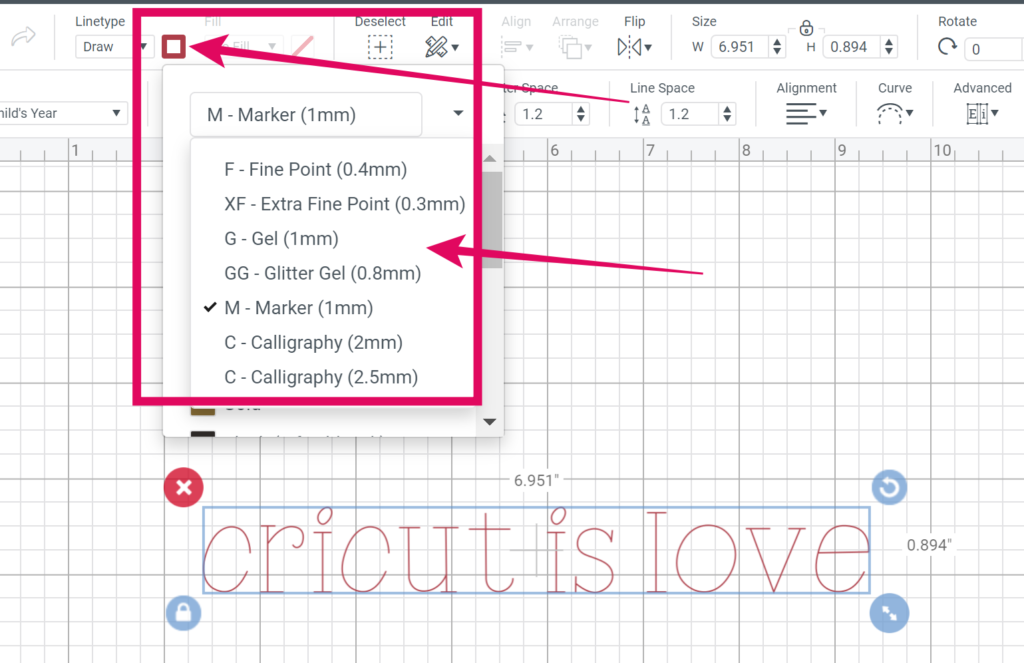
Step 4: Choose Pen

Next, go ahead and choose the type of pen that you’re working with so Cricut can adapt its settings based on the pen selected. To choose the pen type, click on the colored square right beside “linetype”.

Step 5: Attach and Send to Mat

Once you’re happy with the look of your text, you can go ahead and click on ‘make it” to send the text to your mat. If you’re working with an image and a text like I showed you in the video below, be sure to select everything and click on “attach” at the bottom right-hand side corner. This ensures that everything stays in place when you send it to the mat.

Step 6: Add your pen

Next, insert your pen in Clamp A, designed for accessories. Make sure the pen’s arrow is pointing towards you. Push the pen inside until you hear a click and the arrow gets hidden in the clamp. Alright, you’re now ready to start writing/drawing with your Cricut!

Where to Use the Writing/Drawing option?

Now, you must be wondering what can you use the writing/drawing option for? What’s the purpose of this feature when you can just use your printer to print the image/text instead?

Well, here are some things that you can do with the Cricut draw/write feature which is not possible with a printer.

  1. You can draw/write on larger size papers. Usually, the maximum size a printer can print on is A4 or a letter-size paper. With Cricut, you can draw on a paper that fits on the 12″x24″ mat. That means you can create your own large artwork to hang by using the draw feature. How awesome is that!
  2. You can also use the draw feature to create artwork/write with metallic pens which is certainly not possible with a printer.
  3. Using the draw feature, you can easily create a card and get it cut at the same time without going through the hassle of printing and then cutting. This is something I’ll teach you in today’s lesson as well
  4. Lastly, you can also use your Cricut to create handmade tags that can be drawn and cut at the same time. This is great if you have a shop as it allows you to create customized tags in a jiffy.

Alright, now that you know the different ways you can make use of the Cricut “draw/write” feature, let’s have a look at how to actually draw/write.

AFFILIATE DISCLOSURE: Cut N Make Crafts is a participant in the Amazon Services LLC Associates Program, an affiliate advertising program designed to provide a means for sites to earn advertising fees by advertising and linking to Amazon.com.

Supplies Needed to Write with Cricut

To draw/write with your Cricut, you just need the basic supplies listed here.

  • Cricut Maker/Cricut Explore
  • Light Grip Cutting Mat
  • Cricut pen
  • Premium Fine Point Blade
  • Free SVG file (you can grab this by signing up for the VIP list below).

Video Tutorial: How to Write and Draw with Cricut

Best Cricut Writing Fonts

While trying to write with your Cricut, you must have noticed that the usual fonts turn the texts into bubbles, outlining the texts instead of writing. So, how do you know what fonts will write instead of creating an outline?

One simple method to find fonts that write is by clicking on Cricut under the “fonts” tab and then selecting “writing” from the filter. This will give you a list of fonts designed for writing. Unfortunately, these fonts are not free and cost up to $5.

If you don’t want to pay for these fonts, you can download the following fonts which are completely free for PERSONAL USE. If you’d like to use them for business purposes, be sure to purchase the paid version or else you can get sued by the programmer.

  1. Mathanifo Script
  2. Hello Morgan
  3. Organic Fridays
  4. Kinan
  5. Baby Lexi
  6. Slim Extreme
  7. Yesie
  8. Dhanikans Signature
  9. Kaleidescope
  10. Rachela
  11. Flamenco

Pens Perfect for Writing with Cricut

Cricut pens can be quite pricey but the good thing is you don’t necessarily have to use them. Here’s a list of much affordable pens and markers that you can use with your Cricut.

  1. Pilot Precise V5 Pen
  2. Crayola Fine Line Marker
  3. American Crafts Galaxy Markers
  4. American Crafts Slick Writers
  5. American Crafts Glitter Markers
  6. American Crafts Precision Pens
  7. BIC Round Stic Ballpoint Pen
  8. Jot Marker

How to Write with ANY PEN with Cricut

Lucky for us, there’s now a special adapter set available on Etsy that will allow you to write with literally any pen you have with your Cricut.

This adapter set works with the Maker, Explore Air 2, and Explore Air but not with Explore One. There are 3 different sets to choose from; a set of 8 adapters, a set of 10 and 13 adapters. The set with 13 adapters comes with adapters for the following pens:

1) Sharpie Fine Point (Regular, Metallic & Neon)
2) Sharpie Ultra Fine Point
3) Sharpie Pen (Stylo and Art)
4) Pilot Precise (V5 & V7)
5) BiC Marking (Fine & Ultra Fine)
6) BiC Cristal 
7) Sakura Gelly Roll
8) Amaza Gel Pens
9) Sharpie Oil-Based Paint (fine and extra fine)
10) uni-ball Signo UM-153
11) Fine Line Marker
12) Super Tip 
13) Detailing Gel Pen

Click here to check out the adapter set.

Writing with Cricut FAQs

Can I write with pens other than the Cricut brand?

Yes, you can, check the list of pens given above. You can also get the pen adapter that I shared above to work with literally any pen/marker that you have.

Which fonts are the best?

You can find a huge list of fonts in Design Space that are specially made for writing but you would have to purchase them first. However, if you’re using the fonts for personal use you can check out the fonts given above that are great for writing.

Can you write full letters or is it just going to be an outline?

Yes, you can write full letters if you select the fonts designed just for writing.

The End

With that, we have reached the end of the post where I shared with you the details on how to write with Cricut. I also talked about the different fonts and pens you can use with Cricut to make your projects stand out even more.

If you’re new here, be sure to sign up for the FREE Beginner’s Cricut Course here.

Also, check out: 9 Everyday Objects to Use with Cricut

Related Posts:

  • How to make Magnets with Cricut Explore Air 2 and Cricut MakerHow to make Magnets with Cricut Explore Air 2 and…
  • A Complete Guide to Cricut Blades for BeginnersA Complete Guide to Cricut Blades for Beginners
  • Ultimate List of Cricut Sales EXPIRES 15TH NOV
  • Ultimate Guide to Cricut Mats for BeginnersUltimate Guide to Cricut Mats for Beginners

Filed Under: Cricut Tips Tagged With: Cricut tips for beginners

Previous Post: « Cricut Print and Cut Basics for Beginners + FAQs
Next Post: Must-Have Supplies for Cricut Beginners »

Reader Interactions

Trackbacks

  1. DIY Car Ornament-Cricut Maker Wood Project - Cricut Maker Crafts says:
    December 8, 2019 at 10:53 pm

    […] How to Write with Cricut: Ultimate Guide […]

  2. Must-Have Supplies for Cricut Beginners - Cricut Maker Crafts says:
    February 12, 2020 at 8:06 pm

    […] How to Write with Cricut: Ultimate Guide […]

  3. FREE Favor Box SVG - Bunny&Chick - Cricut Maker Crafts says:
    March 11, 2020 at 8:52 am

    […] How to Write with Cricut: Ultimate Guide […]

Primary Sidebar

Recent Posts

  • DIY Penguin Mug Holiday Decor
  • EASY Holiday Cake Topper Tutorial
  • Super Easy Felt Unicorn Ornament SVG + Tutorial
  • 99 Ideas for DIY Ornaments – So Easy and Fun
  • Free Poinsettia Flower Template SVG + Wreath Tutorial

Amazon Affiliates Disclosure

Cricut Maker Crafts is a participant in the Amazon Services LLC Associates Program, an affiliate advertising program designed to provide a means for sites to earn advertising fees by advertising and linking to Amazon.com.

Footer

cutnmakecrafts

Cricut Maker Crafts
50% off SVG bundle 👇 comment below for the link 50% off SVG bundle 👇 comment below for the link 👇
.
.
So proud of my student @craftablesvg for launching her shop and releasing her first bundle. 👇 comment below for the link to get the bundle at 50% off 👇
.
.

.
.
#cricutprojectsuccess #cricutmadecrafts #cricutmadegift #cricutmakercrafts #cricutmademedoit #cricutproject  #cricutmaker #cricut #cricutmade #designisinthedetails #cricutexploreair2 #svgcuttingfiles #svgfiles #svg #svgdesigns #cricutprojectsuccess #cricutteacher #cricutmachine #cricutcrafting #cricuteasypress #cricutcraft #cricutdesignspace #crikutmakercrafts
The other day I drew a bath, popped on my headphon The other day I drew a bath, popped on my headphones, and played Jim Collin’s book Good to Great on Audible.

In the book, he talks about what differentiates good companies from great companies. 

He wrote the book after very thorough research where he studied some of the top companies such as Walmart, Walgreens, Gillette, Proctor & Gamble, Wells Fargo, etc. 

After months of research on these companies. Jim and his team found something truly phenomenal - the secret sauce behind why some companies went from good to GREAT while others didn't. 

And this is something we all can benefit from whether we have a business or not.

He found that the great companies had CEOs that had one common characteristic. 

And that characteristic is humility. 

The CEOs of the leading companies were extremely humble. They never considered themselves as something of a big deal despite the fact they were CEOs of multinational companies. 

Now how can we apply this to our lives?

You see, being humble also means accepting the fact that I’m not the best and it's okay if I don’t know everything. 

Once we accept this fact, we open the doors to life-changing opportunities. Our approach changes and we start looking at things in a completely different way. 

And this ties in perfectly with crafting and running a small business. 

When it comes to crafting or running a business, we tend to overlook that learning phase. We just don’t want to take the time to learn something. We're just not ready to accept the fact that we need help and most of the time it's because our ego takes over.

Every skill has three phases: 

1) learning 

2) practicing 

3) mastering. 

We often want to skip the first two phases and immediately want to jump to the third one. 

Like OMG I just saw this project and I just got Cricut and I’m gonna make it right now. 

This is good.

However, sometimes this mindset leads to failure. We get so caught up in attempting the project that we overlook the basics and end up frustrated.

The same concept applies to starting a business like an SVG business. 

We want to skip the part of learning to design (contd in comments)
Check it out via the link in bio. Click on my name Check it out via the link in bio. Click on my name to go to my bio
.
.
.

.
.
#cricutprojectsuccess #cricutmadecrafts #cricutmadegift #cricutmakercrafts #cricutmademedoit #cricutproject  #cricutmaker #cricut #cricutmade #designisinthedetails #cricutexploreair2 #svgcuttingfiles #svgfiles #svg #svgdesigns #cricutprojectsuccess #cricutteacher #cricutmachine #cricutcrafting #cricuteasypress #cricutcraft #cricutdesignspace #crikutmakercrafts
Sharing SVGs or asking for SVGs that someone purch Sharing SVGs or asking for SVGs that someone purchased is unethical.
.
Designers put their heart and soul into creating designs. They have bills to pay too. A majority of the designers are stay at home moms who are working from home to support their family.
.
By sharing their designs for free in groups, you’re stealing from them, you’re stealing from their family.
.
The correct thing to do is to share the link to the shop or the website where you got the SVG from. So the designer can benefit. 
.
Everyday there are new pages and groups popping up sharing links to Google drives with SVGs or sharing SVGs in threads which is wrong at so many levels.
.
Please educate yourself and others so everyone can benefit 💕
.
#cricutprojectsuccess #cricutmadecrafts #cricutmadegift #cricutmakercrafts #cricutmademedoit #cricutproject  #cricutmaker #cricut #cricutmade #designisinthedetails #cricutexploreair2 #svgcuttingfiles #svgfiles #svg #svgdesigns #cricutprojectsuccess #cricutteacher #cricutmachine #cricutcrafting #cricuteasypress #cricutcraft #cricutdesignspace #crikutmakercrafts
Load More... Follow on Instagram

Hi, friend! I’m Jav, a research assistant/SVG design coach. I’m here to help you design and sell SVG cut files. Check out my SVG Business Podcast if you want to start your own SVG business!


Cut N Make Crafts Privacy Policy

ARCHIVES

Copyright © 2021 · Sprinkle Pro theme by Restored 316

We use cookies to ensure that we give you the best experience on our website. If you continue to use this site we will assume that you are happy with it.Ok