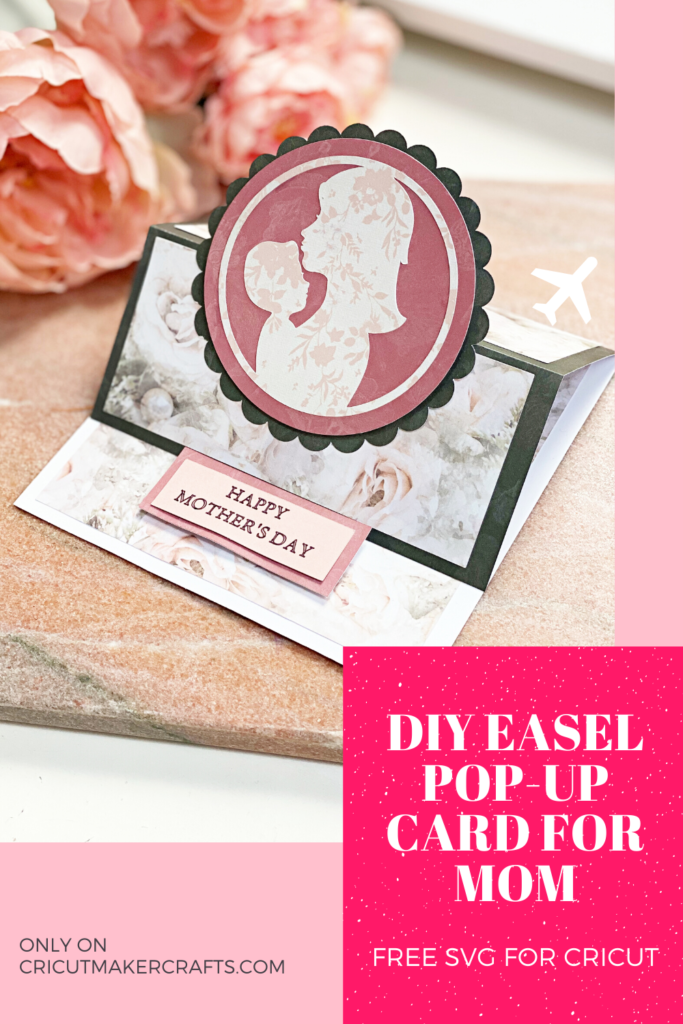
In this tutorial, I’ll be showing you how to make a pop-up Mother’s Day card that’s also a great beginner Cricut project with a FREE SVG cut file for the Mother’s Day card.
This Mother’s Day card is inspired by the AMAZING works of Mixed Up Craft. She’s the QUEEN of card making and I’ve fallen madly in love with her work.
I saw this daffodil card on her blog and I just knew I had to make something like that. So, inspired by her work, today I’ll be showing you how to make an extremely easy easel pop-up card for Mother’s Day.
I’ve included the steps for both the design space desktop and the iPad app so even if you do not have a computer, you can make this card using your iPad. Yay!
Alright now let’s have a look at the materials first.
AFFILIATE DISCLOSURE: Cut N Make Crafts is a participant in the Amazon Services LLC Associates Program, an affiliate advertising program designed to provide a means for sites to earn advertising fees by advertising and linking to Amazon.com.
- Cricut Maker/Cricut Explore
- Light Grip Cutting Mat
- Essential Tools Set
- Scoring wheel or scoring stylus
- Scrapbook paper pad
- Scotch Tacky Glue
- Cricut Fine Point Pen
How to Make a Pop-up Mother’s Day Card – Video Tutorial
Video Transcript for Mother’s Day Card
So, you’re gonna need different colors of cardstock. I recommend using cardstock from one paper pad so that all the colors and patterns are cohesive. That’s what’s gonna give your card a beautiful look.
Next, you’ll need the scoring stylus or scoring wheel. Any of those would do. If you’re using the Explore, you’d have to use the stylus but if you’re using the Cricut Maker you can use either of those.
You’re also gonna need scotch tacky glue. It’s my FAVOURTE paper glue of all, it doesn’t curl up the paper and dries off instantly so I highly recommend this glue for paper crafting.
Next, you’ll need a double sided adhesive tape to stick the paper on top of one another. The reason we’ll be using the tape instead of the glue is because the tape will ensure everything is even which is not possible with the glue.
You’ll also need mountain tape if you’d like to give a 3D lifted effect to your elements.
And ofcourse you’ll need the free SVG cut file. I’ll now show you the steps for downloading and importing the free svg file in design space on the desktop.
If you’re using an iPad, just forward the video until you reach the iPad part.
Okay so once you have your file is in design space, this is what it will look like. Go ahead and read the copyrights instructions given.
So the file is pretty big in size so I’m gonna reduce the size by going to the edit panel.
Alright, that’s pretty manageable.
Next, I’m gonna ungroup everything, and delete the copyrights notice cz we don’t wanna cut it.
Okay, now let me check the size of this entire card. So I want my card to be a little less than 12” so it can easily fit on a 12”x12” cardstock.
You can resize it to whatever size you like, but make sure when you’re doing it, you resize everything together or else the elements won’t fit together.
Next, I’m gonna change these two lines here to score lines. This is something that needs to be done manually.
Next, I’m gonna select the lines and the card and attach them together so they don’t move around when we move the mat.
Okay, now its time to weld the mom silhouette to the circle so that it gets cut together as one.
Now, I’m gonna show you how to add custom message on this rectangle to place on top of the card.
So, click on the text option here, next, type in your text.
Now change the linetype from cut to draw.
Let me resize this to fit in this tiny rectangle.
So this is what you’ll end up with. Now, if you don’t want this bubble look, you can go to the font menu, and from the filter select writing, and you’ll see all these fonts especially made for writing.
Now, if you don’t want to purchase these fonts, and use something that’s free instead, check out the list of fonts given in the description of this video.
You can install these fonts on your computer and use them instead of buying new ones from here.
So I’m pretty happy with these bubble fonts so next I’m gonna select both the font and the rectangle and attach them together.
This is an extremely important step, never ever forget this part.
Now, I’m just gonna modify the colors here so everything that needs to be cut from 1 cardstock, sticks together.
Alright, we’re now ready to get this baby CUT!
I’m gonna select medium cardstock from here.
And if you don’t have a scoring wheel, just click on edit tools and switch to the stylus. Alright, we’re ready for the machine to do it’s magic.
I’ll now show you how to import the file and modify it in the Design Space iPad app.
If you’re using the computer, you can forward this part and go to the cutting part.
Once you’ve uploaded the image to design space, go to images, tap on the filter at the top right corener and from the dropdown menu, tap on my images. You should be able to see the file now, tap on the file followed by insert image.
Okay so once you have your file in design space, this is what it will look like. Let me reduce the size first so we can easily see the whole project. Go ahead and read the copyrights instructions given.
Next, I’m gonna ungroup everything, and delete the copyrights notice cz we don’t wanna cut it.
Next, I’m gonna change these two lines here to score lines. So first I’m gonna tap and hold each line to select them together. Next, I’m gonna go to linetype. And from the dropdown menu I’m gonna select score. This is something that needs to be done manually.
Next, I’m gonna select the lines and the card and attach them together so they don’t move around when we move the mat. To attach, I’m goonna go to actions, and tap on attach.
Okay, now its time to weld the mom silhouette to the circle so that it gets cut together as one.
Okay, now let me check the size of this entire card. So I want my card to be a little less than 12” so it can easily fit on a 12”x12” cardstock.
You can resize it to whatever size you like, but make sure when you’re doing it, you resize everything together or else the elements won’t fit together.
Now, I’m gonna show you how to add custom message on this rectangle to place on top of the card.
So, click on the text option here, next, type in your text.
Let me resize this to fit in this tiny rectangle.
Now change the linetype from cut to draw.
So this is what you’ll end up with. Now, if you don’t want this bubble look, you can go to the font menu, and from the filter select writing, and you’ll see all these fonts especially made for writing.
So I’m pretty happy with these bubble fonts so next I’m gonna select both the font and the rectangle and attach them together. Alright, we’re now ready to cut this out!
So these are all the papers that I’ll be using. As you can see they all are perfectly coordinated because they’re from the same paper pad.
I’m gonna cut out the base first and this is my scoring wheel that I’ll be using. Let me show you how to place this in the clamp. Make sure the grooves align and fit together.
If you’re using a stylus instead of the wheel, place it in clamp A with the arrow pointing towards you. Push the stylus inside until you hear the click sound and the arrow disappears. Now close the clamp. I’m using the scoring wheel so I don’t need this stylus.
Alright, now I’m gonna write out the message. So I’m using the fine point pen that came with my Cricut. I’m gonna place it in clamp A, just like I placed the stylus with the arrow pointing downwards.
Alright, that looks pretty good.
Now, let’s assemble this thing.
So this is the adhesive tape that I’ll be using, you can also use this one.
I’m gonna add this tape on the base layer to stick the second layer of cardstock on top.
Next, I’m gonna add two layers of mountain tape, and this is completely optional to add a lifted 3D effect.
Now, I’m gonna use the scotch glue to attach the silhouette to this cut out.
Next, I’m gonna add some tape at the back of this piece and place it along the fold here so that a little more than a half is sticking out. Like this.
Since the inside of my paper was plain white, I added another layer of cardstock similar to the one outside. Now, I’m just gonna place the message with the back ground roughly 1” away from the bottom edge using mountain tape. And there you go! Your card is ready!
More Helpful Cricut Posts
With that, we have reached the end of this tutorial where I showed you how to make your own pop-up Mother’s Day card. Don’t forget to check out these Mother’s Day Cricut projects too!
Mothere’s Day Cricut Projects
Before you go, check out these amazing Cricut posts!
- 9+ AMAZING Craft Paper Storage Ideas
- 9 Must-Have Everyday Objects for Cricut Owners
- Unique Blank Gift Ideas for Her
Don’t forget to save this Mother’s Day project for later


![Layered Wall Art Mermaid Craft [Cricut Project]](https://cutnmakecrafts.com/wp-content/uploads/2020/04/diy-wall-art-mermaid-craft-cricut-project-1-150x150.jpg "Layered Wall Art Mermaid Craft [Cricut Project]")


[…] How to make pop-up Mother's Day card [Cricut Project] […]