• About
    • Cut N Make Crafts Privacy & Disclosure Policy
    • Disclaimer
  • JOIN THE SVG SUPERSTAR WAIT LIST

Cut N Make Crafts

Cricut Maker Crafts for Beginners

  • Home
  • SVG Business Podcast
    • Ep: 1 Why Sell SVG Cut Files
    • Ep 2: From a full-time nurse to an SVG designer – Farren Celeste
    • Ep 3: 400+ Sales in 4 months – Find out the secret to Emma’s success
    • Ep 4: No. 1 Thing You Need to Succeed in SVG Business
  • Designing SVGs
    • 3 COSTLY SVG Mistakes to Avoid – Cricut Crafts
    • 5 Epic Reasons to Create Your Own SVGs
  • Free SVG Files
  • Cricut
    • FREE Beginner’s Cricut Course
    • Cricut Tips
      • Vinyl Tips
        • MUST-HAVE The Ultimate Life-Saver Vinyl Guide for Beginners
        • Different Types of Vinyl and How to Use Them
        • How to use heat transfer vinyl for Cricut
        • How to Keep Iron-on Transfers from Peeling
        • 5 Terrible Iron-on/HTV Mistakes to Avoid – Tips for Iron-on Transfers
        • How to Layer Vinyl in Cricut Design Space
        • 9 UNIQUE Heat Transfer Vinyl Projects to Try
      • Cricut Design Space Help
      • 9 Must-Have Everyday Objects for Cricut Owners
      • Convert Picture to SVG – 3 Quick and Easy Methods
      • Cricut Print and Cut Basics for Beginners + FAQs
      • A Complete Guide to Cricut Blades for Beginners
      • 30+ Cricut Tips for Beginners for the Best Cut
      • Ultimate Beginner’s Guide to Cricut Tools
      • Ultimate Guide to Cricut Mats for Beginners
      • Lesson 1: Cricut Introduction and Set-Up
      • A Beginner’s Guide to Design Space
    • Cricut Crafts for Beginners
      • Birthday Crafts
        • DIY Hand-lettered Cake Topper (Cricut)
      • Cricut Flowers
        • EASY Giant Paper Gerbera Daisy Template FREE SVG
        • DIY Rose Paper Flower Bouquet – FREE SVG for Cricut
        • EASY Crepe Paper Sunflower FREE SVG+TEMPLATE
      • Cricut Felt Projects
        • Cute Felt Frog Craft [Template+SVG Free]
        • Cute DIY Felt Pencil Toppers [FREE SVG]
        • Cute DIY Felt Cloud Wall Hanging [FREE SVG]
      • Cricut Kids Crafts
        • Paper Popsicle Craft [FREE SVG + PDF]
        • Super-Cute Turtle Paper Craft for Kids [FREE SVG+PDF]
        • Paper Plate Fox Cricut Craft for Kids [FREE SVG]
        • Must-Have Supplies for Cricut Beginners
        • How to Write with Cricut: Ultimate Guide
        • FREE Graduation Card SVG File + Intricate Cut Tips + Tutorial
      • Cricut Vinyl Projects
        • 4th of July Mason Jars with Patriotic SVG (FREE)
        • DIY Vinyl Mug Cricut Gift for Teachers
        • How to Make a Custom Tea Towel with Cricut
        • Cricut Mason Jar Labels DIY – FREE SVG
        • DIY Car Ornament-Cricut Maker Wood Project
        • How to Layer Vinyl in Cricut Design Space
      • Fall Crafts
      • Graduation Crafts
      • Home Decor
        • DIY Welcome Tile with Cricut [FREE SVG]
      • Mother’s Day Crafts
        • Free Mother’s Day SVG – Gift Box Tutorial
      • Unicorn Crafts
        • DIY Unicorn Bookmark Using Cricut
        • DIY Unicorn Hair Clips – FREE SVG
        • DIY Unicorn Paper Clips – Beginner Cricut Project
        • How to Make a Unicorn Birthday Banner – FREE SVG
      • Wedding Crafts
        • FREE Wedding Card SVG File + Tutorial
        • Wedding Themed Lantern FREE SVG

How to use foil quill with Cricut +TIPS

June 12, 2020 by Jav

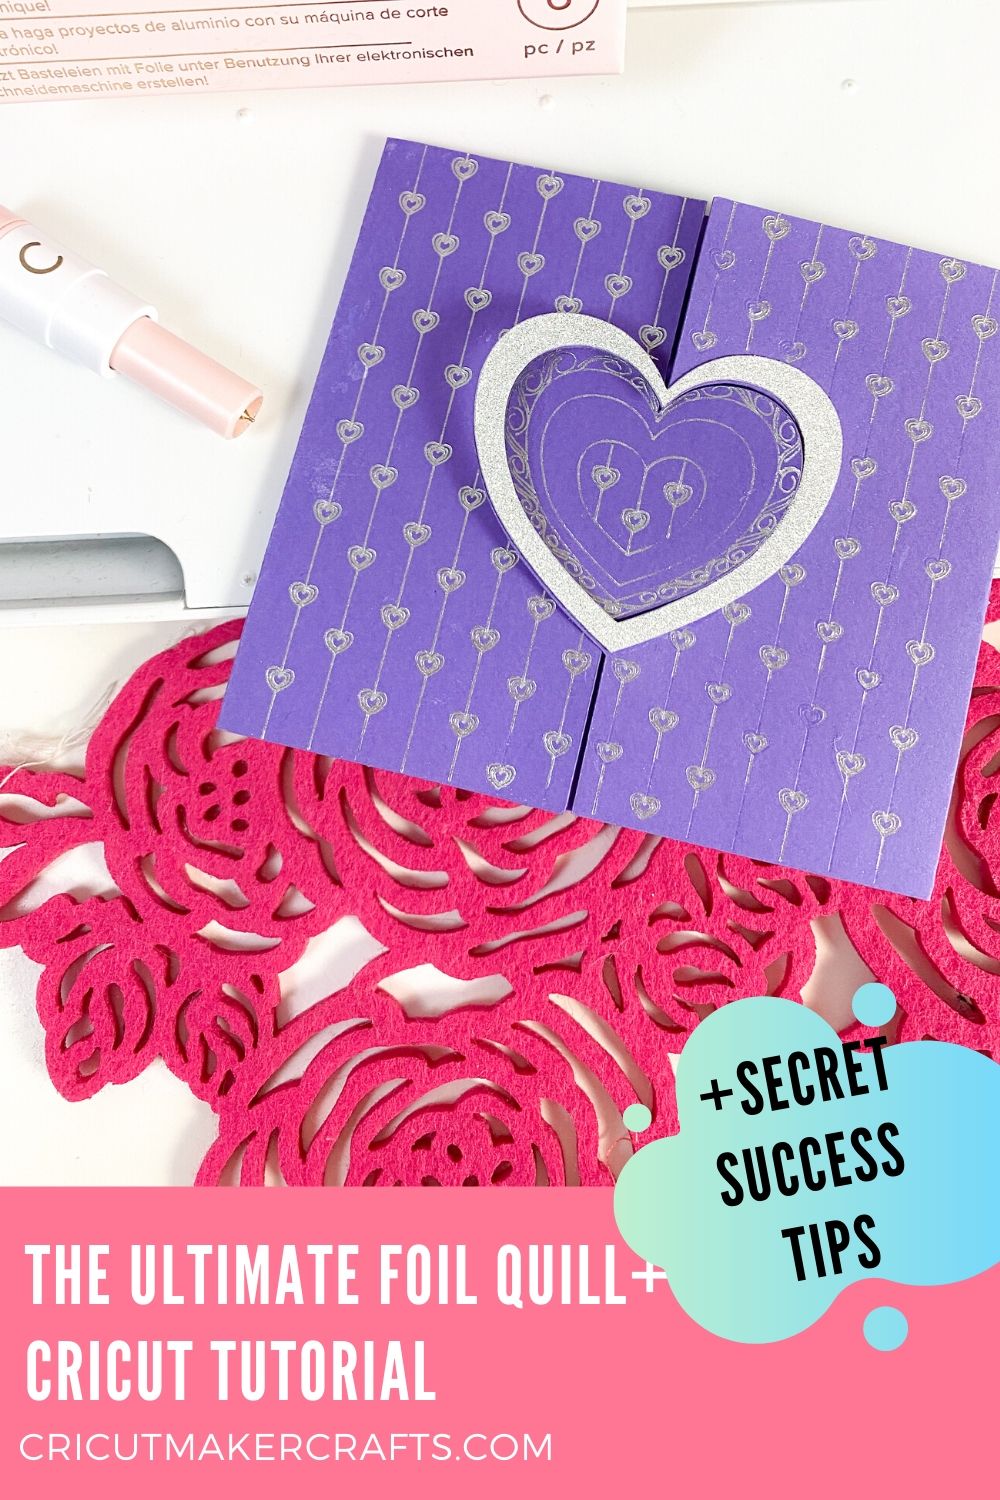
In this post, you’ll learn how to use foil quill with Cricut along with some helpful tips to get the best possible result. I’ll be using the foil quill started kit by We R Memory Keepers for this tutorial. You’ll also get a FREE card SVG to use with foil quill for this project.

AFFILIATE DISCLOSURE: Cut N Make Crafts is a participant in the Amazon Services LLC Associates Program, an affiliate advertising program designed to provide a means for sites to earn advertising fees by advertising and linking to Amazon.com.

Table of Contents

  • What is Foil Quill by WRMK
  • Types of Foil Packs for Foil Quill
  • Helpful Tips for Using Foil Quill with Cricut
  • Supplies Needed for DIY Custom Tea Towel
  • How to Use Foil Quill with Cricut – Video Tutorial
    • Prepare the Image to use with Foil Quill Pens with Cricut
    • Cut out the Card
    • Save this project for later by clicking the “save” button!
  • More Cricut Projects to Try

What is Foil Quill by WRMK

The Foil Quill by We R Memory Keepers [WRMK] is a set of heat activated foiling pen, that use power to add a foil imprint on the materials. 

The pens come with an adapter that can be attached to your cutting machine (Brother ScanNCut, Cricut or Silhouette) or any other USB outlet (I use a portable phone charger). Once the adapter is attached, you can insert the pens in the accessory slot of your machine to create beautiful shiny prints.

These prints are PERMANENT unlike vinyl and don’t peel off! How amazing is that!

The best thing about Foil Quill is that it can be used to add some very detailed intricate artwork to your projects without having to spend time weeding everything. Think Mandalas, Zen tangles and flourishes!

There are 3 different types of pens available in this collection.

  • The fine tip Foil Quill pen
  • The standard tip Foil Quill pen and 
  • The bold tip Foil Quill pen

These pens can be purchased together or separately.

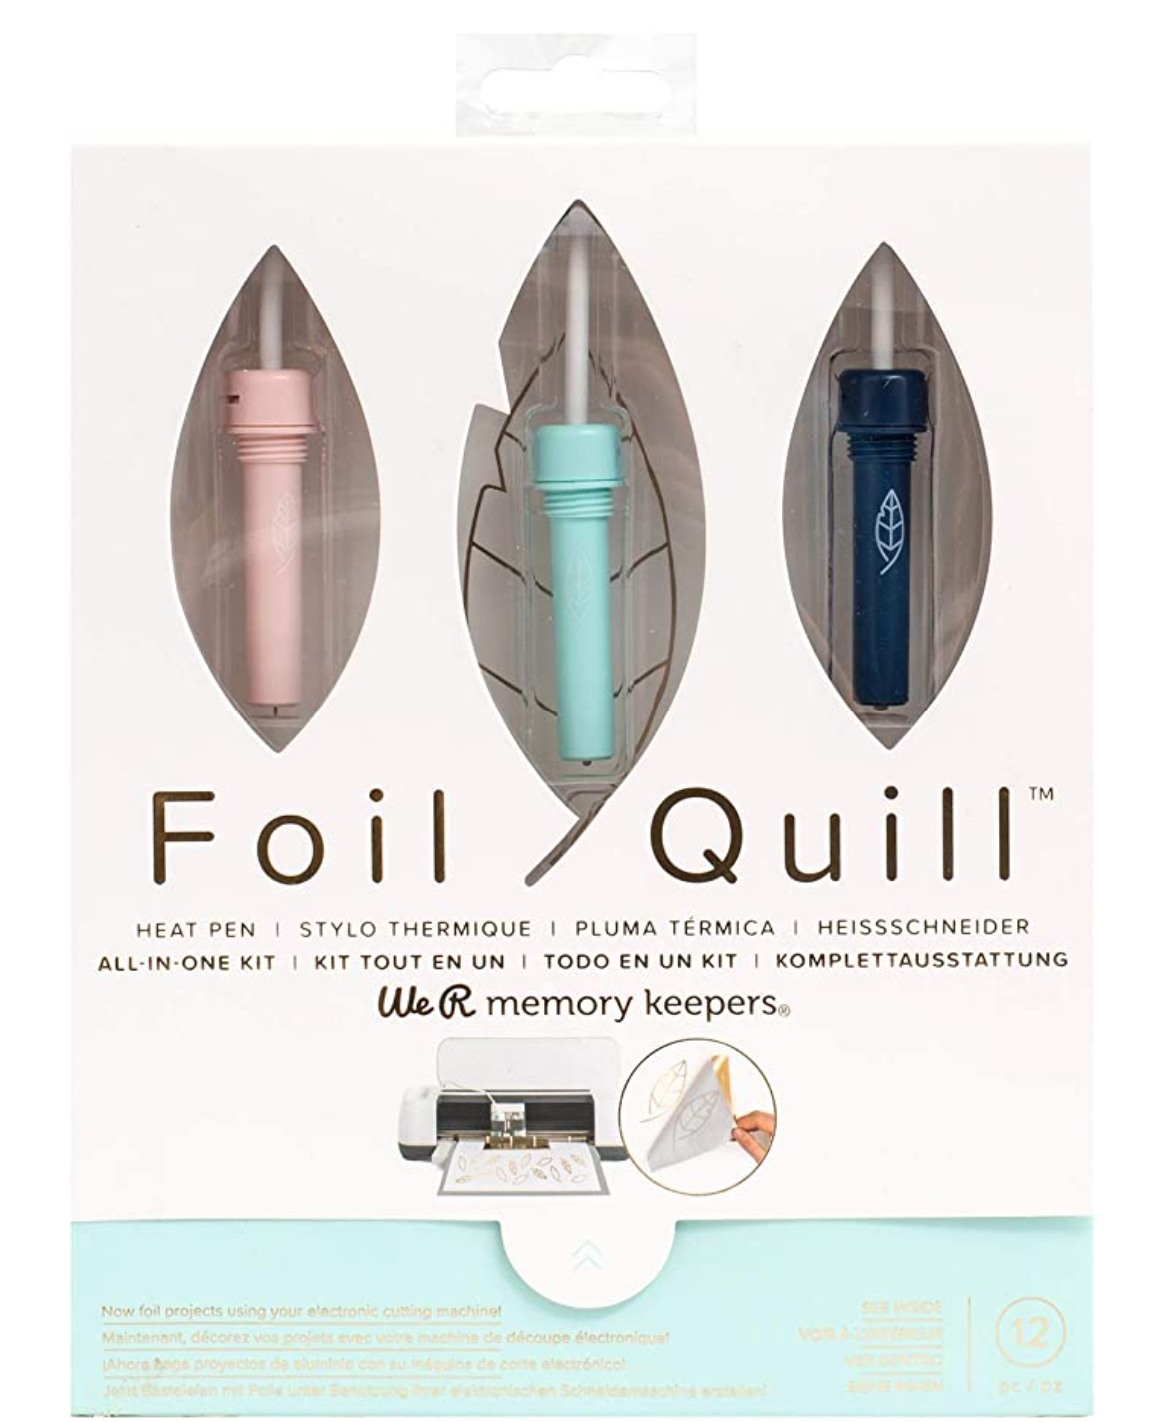
I purchased the fine tip Foil Quill pen via the Facebook marketplace along with a ton of foils because I simply LOVE getting craft supplies for a bargain. However, I was SO thrilled at that time, I didn’t realize it was just ONE pen, so in my video, I would not be able to demonstrate how all three pens work.

Types of Foil Packs for Foil Quill

The heat activated foils for Foil Quill are available in three different sizes.

  1. Extra large roll 12″x96″
  2. 12″x12″ Sheets with 15 foil sheets in each pack
  3. 4″x6″ Sheets with 30 foil sheets in each pack

Today, I’ll be using 4″x6″ sheets as I got a ton of them when I purchased my Foil Quill pen. 

Helpful Tips for Using Foil Quill with Cricut

Before I show you how to use the Foil Quill with Cricut, here are some helpful tips for using the Foil Quill pens to get the best results possible.

  1. Use a Foil Quill Magnetic mat
  2. Use a portable phone charger: instead of using the USB port on your machine, use a portable phone charger or a any other USB plug-in charging device so that your machine does not get adversely affected when using the Foil Quill.
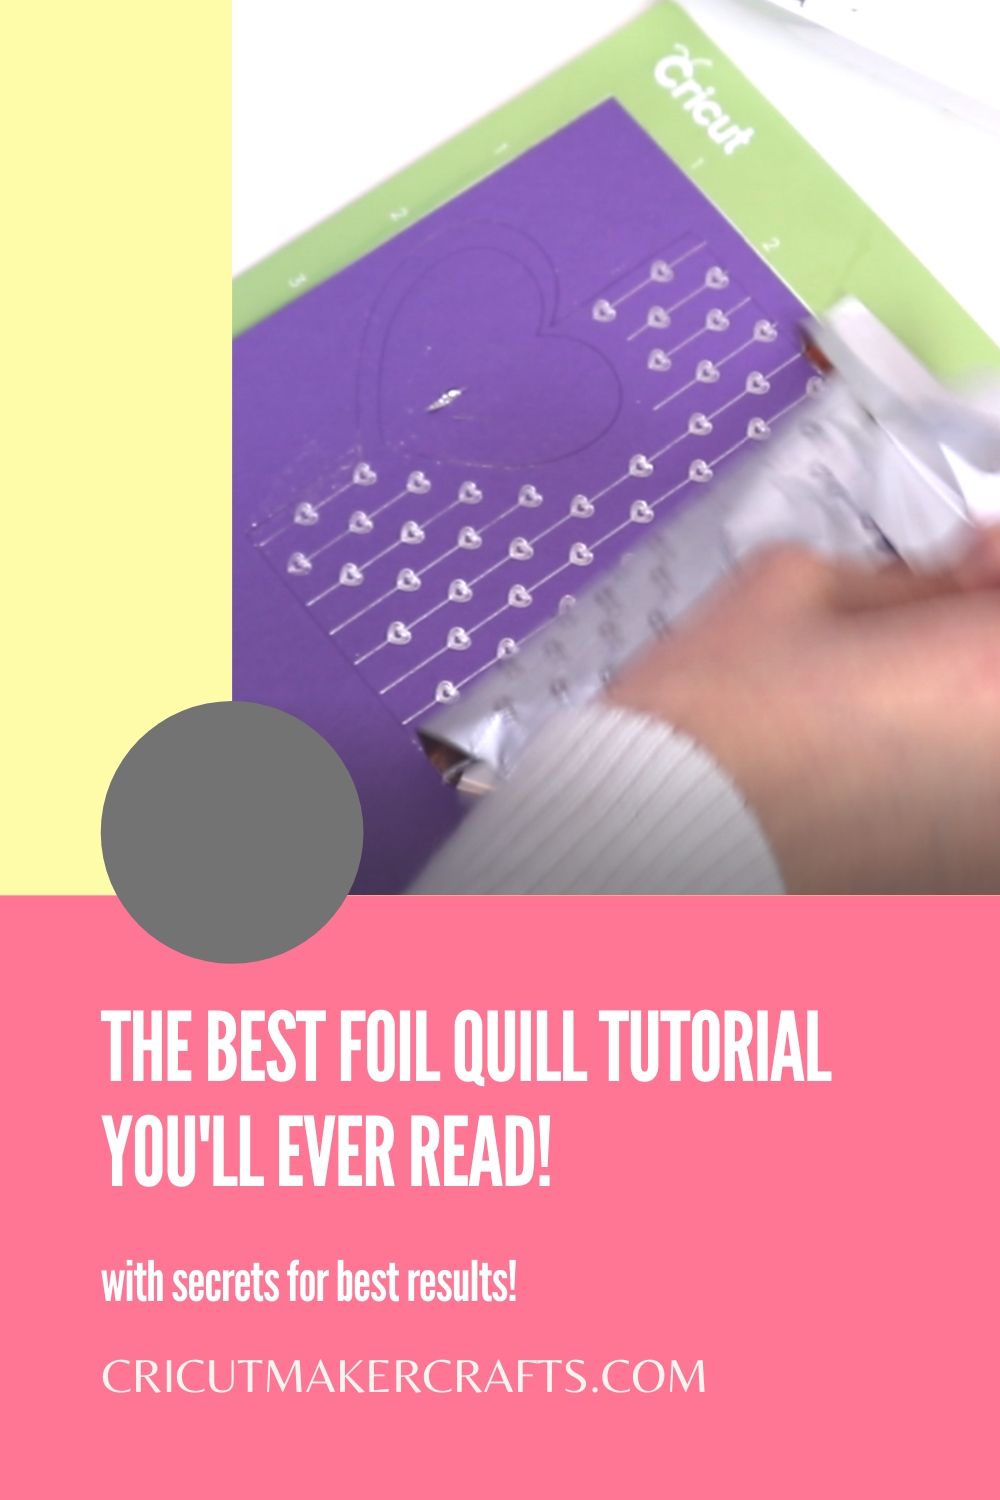
  3. Move the star wheels: another tip is to make sure the star wheels are not right on top of the foil as it might rip the foil or leave foil marks on the paper. Therefore, it’s best to move the star wheels so they’re either on the washi tape (used to stick the foil onto the material) or on the card-stock.
  4. Avoid extremely small and intricate designs: if the designs are too small and intricate, it can cause the foil to rip apart. This happened FOUR times with me while I was testing out the foil quill. I’m assuming it was either due to the close proximity of the designs or because the tip of the pen became too hot, which brings me to the next tip.
  5. Let the Foil Quill pen cool: don’t use the pen if the tip is too hot, as it will rip off the foil. I noticed this while I was testing my design and the pen had been in constant use for almost half an hour. Allow the pen to cool between intervals to get the best results possible.
  6. Reduce the design size: ensure the size of the design it at-least an inch smaller than the foil to allow enough room for the washi tape because the pen does not work over the washi tape and your design would end up incomplete.

Let’s have a look at all the supplies now.

Supplies Needed for DIY Custom Tea Towel

  • Cricut Maker/Cricut Explore
  • Light Grip Cutting Mat
  • Essential Tools Set
  • Cardstock (250/80lb gsm
  • Quick Dry Tacky Glue
  • Premium Fine Point Blade
  • Scoring wheel (recommended) or can also use a scoring stylus 
  • Washi tape
  • Foil Quill Pens by WRMK
  • Foil Quill Foil 
  • FREE SVG cut file for the heart card [for the VIPs, become a VIP by signing up for the email list below!]

How to Use Foil Quill with Cricut – Video Tutorial

How to Use Foil Quill with Cricut

Prepare the Image to use with Foil Quill Pens with Cricut

  1. First, download the FREE SVG file for the card on your desktop. 
  2. Once you have uploaded the SVG file to Design Space, add it to your canvas.
  3. Go ahead and read the copyrights notice.
  4. Next, un-group everything and delete the notice as we don’t want to cut it out.
  5. Next, resize the card the way you like. Since the size of my foil is 4”x6” I need to make sure the design is at-least half an inch less to allow enough room for the washi tape to stick. We don’t want any part of the design coming onto the washi tape and the pen will not work and instead you’ll have a blank spot. So resize the card based on your needs.
  6. Change ALL the details to draw instead of cut.
  7. So select each group from the layers panel and click on draw from the drop-down menu under linetype.
  8. Next, look for the straight lines or select them from the image and change them to score.
  9. Next, click and drag to select all the elements and click on attach to ensure these things stay intact when we go to the mat.
  10. Now, let’s add a little message on the lining section of the card.
  11. Once again, don’t forget to change the linetype to draw as the foil quill only works with the draw feature selected.
  12. Once you’re happy attach the text to the lining and now it’s time to cut everything out!
  13. So, click on make it and go to your mat.
  14. Select medium or heavy cardstock from the menu. If you’re using the desktop skip this part and go to the cutting instructions.

Cut out the Card

  • Next, place the foil on the mat and stick it down with a washi tape. Remember, we are placing the foil wrong side down with the right side facing up.
  • Next, screw the pen to the pen adapter and insert it inside the accessory slot on your Cricut.
  • Add the scoring wheel, move the star wheels so that they aren’t directly on the foil as it can leave marks on the foil. Now, wait for the magic!
  • Cut out the other side of the card along with the inner lining.
  • Next, assemble the card together.
  • So first, fold along the score lines, using the spatula to perfect the crease.
  • Add some glue at the back and stick the two gates together.
  • The last step is to add this outline. This is something I almost deleted because I was unsure of how it would look but after cutting it out, I fell in love with it and there you go!
  • A gorgeous foil quill card is ready!

Save this project for later by clicking the “save” button!

More Cricut Projects to Try

Want more Cricut project inspiration? Check out these posts!

  1. 11+ UNIQUE Craft Vinyl Storage Ideas
  2. Convert Picture to SVG – 3 Quick and Easy Methods
  3. Different Types of Vinyl and How to Use Them

Related Posts:

  • How to download SVG files from Etsy to Cricut (Desktop&iPad)How to download SVG files from Etsy to Cricut (Desktop&iPad)
  • 9 EASY Mother's Day Cricut Gifts9 EASY Mother's Day Cricut Gifts
  • How to make Magnets with Cricut Explore Air 2 and Cricut MakerHow to make Magnets with Cricut Explore Air 2 and…
  • 30+ Cricut Tips for Beginners for the Best Cut30+ Cricut Tips for Beginners for the Best Cut

Filed Under: Cricut Paper Crafts, Cricut Tips Tagged With: cricut cards, cricut crafts for beginners

Previous Post: « DIY Welcome Tile with Cricut [FREE SVG]
Next Post: Paper Plate Fox Cricut Craft for Kids [FREE SVG] »

Primary Sidebar

Recent Posts

  • DIY Penguin Mug Holiday Decor
  • EASY Holiday Cake Topper Tutorial
  • Super Easy Felt Unicorn Ornament SVG + Tutorial
  • 99 Ideas for DIY Ornaments – So Easy and Fun
  • Free Poinsettia Flower Template SVG + Wreath Tutorial

Amazon Affiliates Disclosure

Cricut Maker Crafts is a participant in the Amazon Services LLC Associates Program, an affiliate advertising program designed to provide a means for sites to earn advertising fees by advertising and linking to Amazon.com.

Footer

cutnmakecrafts

Cricut Maker Crafts
50% off SVG bundle 👇 comment below for the link 50% off SVG bundle 👇 comment below for the link 👇
.
.
So proud of my student @craftablesvg for launching her shop and releasing her first bundle. 👇 comment below for the link to get the bundle at 50% off 👇
.
.

.
.
#cricutprojectsuccess #cricutmadecrafts #cricutmadegift #cricutmakercrafts #cricutmademedoit #cricutproject  #cricutmaker #cricut #cricutmade #designisinthedetails #cricutexploreair2 #svgcuttingfiles #svgfiles #svg #svgdesigns #cricutprojectsuccess #cricutteacher #cricutmachine #cricutcrafting #cricuteasypress #cricutcraft #cricutdesignspace #crikutmakercrafts
The other day I drew a bath, popped on my headphon The other day I drew a bath, popped on my headphones, and played Jim Collin’s book Good to Great on Audible.

In the book, he talks about what differentiates good companies from great companies. 

He wrote the book after very thorough research where he studied some of the top companies such as Walmart, Walgreens, Gillette, Proctor & Gamble, Wells Fargo, etc. 

After months of research on these companies. Jim and his team found something truly phenomenal - the secret sauce behind why some companies went from good to GREAT while others didn't. 

And this is something we all can benefit from whether we have a business or not.

He found that the great companies had CEOs that had one common characteristic. 

And that characteristic is humility. 

The CEOs of the leading companies were extremely humble. They never considered themselves as something of a big deal despite the fact they were CEOs of multinational companies. 

Now how can we apply this to our lives?

You see, being humble also means accepting the fact that I’m not the best and it's okay if I don’t know everything. 

Once we accept this fact, we open the doors to life-changing opportunities. Our approach changes and we start looking at things in a completely different way. 

And this ties in perfectly with crafting and running a small business. 

When it comes to crafting or running a business, we tend to overlook that learning phase. We just don’t want to take the time to learn something. We're just not ready to accept the fact that we need help and most of the time it's because our ego takes over.

Every skill has three phases: 

1) learning 

2) practicing 

3) mastering. 

We often want to skip the first two phases and immediately want to jump to the third one. 

Like OMG I just saw this project and I just got Cricut and I’m gonna make it right now. 

This is good.

However, sometimes this mindset leads to failure. We get so caught up in attempting the project that we overlook the basics and end up frustrated.

The same concept applies to starting a business like an SVG business. 

We want to skip the part of learning to design (contd in comments)
Check it out via the link in bio. Click on my name Check it out via the link in bio. Click on my name to go to my bio
.
.
.

.
.
#cricutprojectsuccess #cricutmadecrafts #cricutmadegift #cricutmakercrafts #cricutmademedoit #cricutproject  #cricutmaker #cricut #cricutmade #designisinthedetails #cricutexploreair2 #svgcuttingfiles #svgfiles #svg #svgdesigns #cricutprojectsuccess #cricutteacher #cricutmachine #cricutcrafting #cricuteasypress #cricutcraft #cricutdesignspace #crikutmakercrafts
Sharing SVGs or asking for SVGs that someone purch Sharing SVGs or asking for SVGs that someone purchased is unethical.
.
Designers put their heart and soul into creating designs. They have bills to pay too. A majority of the designers are stay at home moms who are working from home to support their family.
.
By sharing their designs for free in groups, you’re stealing from them, you’re stealing from their family.
.
The correct thing to do is to share the link to the shop or the website where you got the SVG from. So the designer can benefit. 
.
Everyday there are new pages and groups popping up sharing links to Google drives with SVGs or sharing SVGs in threads which is wrong at so many levels.
.
Please educate yourself and others so everyone can benefit 💕
.
#cricutprojectsuccess #cricutmadecrafts #cricutmadegift #cricutmakercrafts #cricutmademedoit #cricutproject  #cricutmaker #cricut #cricutmade #designisinthedetails #cricutexploreair2 #svgcuttingfiles #svgfiles #svg #svgdesigns #cricutprojectsuccess #cricutteacher #cricutmachine #cricutcrafting #cricuteasypress #cricutcraft #cricutdesignspace #crikutmakercrafts
Load More... Follow on Instagram

Hi, friend! I’m Jav, a research assistant/SVG design coach. I’m here to help you design and sell SVG cut files. Check out my SVG Business Podcast if you want to start your own SVG business!


Cut N Make Crafts Privacy Policy

ARCHIVES

Copyright © 2021 · Sprinkle Pro theme by Restored 316

We use cookies to ensure that we give you the best experience on our website. If you continue to use this site we will assume that you are happy with it.Ok